Saturday, September 4, 2021

Etched Meadow Flower and Leaves

I am most happy making clean and simple cards, and I have to say, I am really in a very clean and simple mode of late!  I made a simple, quick and easy birthday card this morning, with the beautiful new Simon Says Stamp Etched Meadow Flower and Leaves die from their STAMPtember® release!...
I had cut out the leaves from paint chips(for another idea that didn't happen...yet, anyway), and colored the stem of the flower and the flower, itself, with markers.  LOVE how the paint chips were the same color as the color of the prismacolor marker, not planned, at all!  I stamped the sentiment from an older Simon set, and adhered the flower and leaves to the card panel with a couple little glue dots on the backside of the flower, and tape runner on a few parts of the stems.  I used the cut lines in the flower and leaves to make folds in them both, that gave them very cool dimension!! I LOVE this about the flower dies in the STAMPtember® release..their etching gives them dimension!!   I popped the panel up on a card, added a few jewel drops, and done!  Here's a close up...
Ahhhh...simply done birthday card....and this beautiful flower die makes it so easy to accomplish that...happiness!!  
Thanks for visiting me today!! Hugs!! Lisa
Thursday, September 2, 2021

STAMPtember® Party!

There's a party going on at Simon Says Stamp's Blog, today!!  I am a thrilled to be a part of this wonderful party, celebrating Simon's STAMPtember® release!!  This release happens every year, is a month long celebration of all things stamping and cardmaking, and is by far, Simon's biggest release!!  There are also amazing collaborations with other stamp companies throughout the month!  You can go to the Simon Blog to see all the participants at today's party, it is going to be inspirational and fun!!  
I made a card today, that uses one of the beautiful new dies, to share for the party....
I don't know about you, but these last couple years have been really hard.  I haven't seen one of my daughters in almost 2 years.  I miss her more than any words, but had an idea for a card that would help me express it a bit better.  I am from Western New York, where the Maple trees are everywhere, and maple leaves are right up there with rainbows and daisies, for me, when it comes to things I love!  I knew my daughter would understand this leaf, meaning another Fall that we have been apart.  This Ornate Leaves die is beautiful and if you know me, you might guess that paint chips are the only way that I could fill in the pieces of this pretty ornate leaf...
I die cut a leaf, put runner adhesive all over the die cut, and then put the the outline and paint chip pieces on the adhesive.  I used three shades of yellow to fill in the pieces.  The paint chips I used were narrow , I couldn't cut whole leaves from eachy shade, so I had to adjust my die cutting to make certain I got the right parts of the leaf to coincide with the needed pieces for shading on the die cut (hope that makes sense!).  I then adhered two more die cut outlines onto the colored leaf.  I adhered the leaf to a card with two outlines adhered to the card, and a pretty new sentiment from the Printmaking Florals stamp set!  Here's a close up...
I had so much fun creating a card with such a pretty maple leaf and sentiment!!  
I hope you will check out the party over at the Simon Blog!  There is an offer and code in the banner at the top of my post, for a Large Happy Birthday die with the purchase of $30 or more!  The really cool and fun part of this offer, is that it's not the only one at the party!  Think of this as a sort of scavenger hunt...there are different offers at different stops at the party...you will need to check out the other places at the party to uncover the other wonderful offers!!  Hope you are not only inspired by the party, but have fun along the way... and, like me, find something you just can't live without:)!!
Have fun, and thanks for stopping by today!! Hugs!! Lisa

Wednesday, September 1, 2021

STAMPtember® Release Crocuses

Happy STAMPtember®!!  Today is the day that Simon Says Stamp releases their wonderful new STAMPtember®  products, and I am so very excited to start sharing this release, with some beautiful flower dies from this new release, the Etched Crocus Stems!...  
I am really in love with the new flower dies, they are simply beautiful and so wonderfully designed, the detail in them makes them come to life on paper!  The crocus even go a bit further in their detail, as the die cut petals give extra depth with flower petals designed to go behind one another!  Lots of crocuses are purple, so I opted to make mine purple.  The first card, they are simply die cut from cardstock, the second, colored with markers.  I love that you can bend the leaves and the flower petals to give them dimension!!  I framed the crocuses in an oval frame and added a cut sentiment from an older Simon sentiment stamp set.  Here's a close up...
The second one, simply done by coloring...
I added a hand cut sentiment strip with the new Simon strips from this release, and masked the background with a Simon stencil and older background stamp.  Here's a close up of this one...
Oh...my...goodness....I just love these flowers, and there are more to come...there is SO MUCH beauty, cool and simply fun, in this new release!!  Can't wait until tomorrow, when there will be a Simon Party, celebrating STAMPtember®!!  Make sure you check out the Simon Blog tomorrow, to see how you can join the party, it will be inspiring, for sure!  I'll be at the party, too, hope to "see" you there!!
Thanks for visiting me today!! Hugs!! Lisa

Tuesday, August 31, 2021

Miss You with Layered Leaves

 I have one last card to share for the month before Simon Says Stamp's BIGGEST release of the year, STAMPtember®, will be out tomorrow!! I can hardly wait!!  There is sooooo much fun in store with all the wonderful new products that will become available, a month long celebration of collaborative releases, and lots of fun!!

 I have made a card using the very cool and pretty Mod Layering Leaves from their Make Magic release, and a CZ Design sentiment die...
I used the Simon Maliblue ink for the leaves, and Audrey Blue for the details.  I then used the brush to brush on some ink to bare cardstock, and die cut the sentiments from the colored pieces.  I added a die cut and layered heart to the middle of the "o" in the YOU, and popped the sentiment onto the popped up card base.  The heart WAS an afterthought, so it needed a bunch of layers to not get lost in the center of the "o"...to stand out on it's own.  There are ALOT of layers to the heart, and in retrospect, I could have gone with lots fewer layers, but I left all the layers...just sayin, in case you were thinking.  And if you weren't thinking and are now, good to see that cards don't have to be perfect to make you perfectly happy!  Here's a close up...
Hope you will check back tomorrow for the Simon release...LOTS of wonderful stamps dies, stencils and stuff!!  I can't wait!!  Thanks for visiting me today!! Hugs!! Lisa

Sunday, August 29, 2021

Reverse Rainbow Mosaic Stained Glass Birthdays

That title is a mouth full...😁!  I have made a couple birthday cards using the very cool  and super fun new Simon Says Stamp Stained Glass Background stamp from their Make Magic release!...
When I saw the title of the stamp, I KNEW I had to make a card making it look like stained glass.  So...what does one do when wanting ideas about stained glass?...I GOOGLED!  I found some rainbow stained glass, and, if you know me, I didn't need to look any further!!  I decided I would make my stained glass a mosaic rainbow.  Only thing is, as I colored the colors, it became a reverse rainbow...but a rainbow none the less.  Here's what I did.  I did what I often do, put the stamp in my MISTI, and stamped the cardstock with Simon smoke ink(I've moved from Fog color, being able to see the colors a bit better with the darker smoke color).  I then colored with my Prisma, Sharpie and Mark It markers.  It looked a little like this (this was my first attempt, and I ruined it by coloring after I had embossed, and the black ran into the color...)...
I then put the colored cardstock back into my MISTI, swiped with my static bag, then stamped with versamark and black embossed.  I continue to LOVE the wonderful shine of the black embossing powder!  
The Simon black embossing powder is ultra fine, which is essential for fine lines like this stamp...another thing I love, as this is the first black embossing powder I have had that is ultra fine!  You can see the cool shine in the  picture below.  I decided to keep the entire embossed and colored image for the first card, but thought I would make a second, and give it a border, to see which I liked better...
I love both of them, so I put them both up!!  Here's a close up of the black embossing...it has such wonderful shine!!...
I know I say this all the time, but rainbows make me so stinkin' happy!!  Hope you have a happy day!!
Thanks for visiting me today!! Hugs!! Lisa

Tuesday, August 24, 2021

Sunny Days Ahead

 I made a card with two Simon Says Stamp dies from the Make Magic release that will help me cheerily encourage a friend going through a tough season ...
I used two shades of yellow cardstock, die cut and then layered the lighter shade a few times, so there was an indent in the rays.  I added a die cut and layered sentiment and adhered it to the card.  This card is super simple in design, but with these two dies, both pretty sizable, there is little need for anything else!   Here's a close up...
Tough times will get better, I often say...It WILL be okay, I don't know when and I don't know how, but it WILL be okay!  Sunny days ARE ahead! I AM thankful for each day and for all the good that each day holds, hey I'm here, and if you're reading this, so are you!!  Take care, and please stay safe!  
Thanks for stopping by my blog today!! Hugs!! Lisa

Sunday, August 22, 2021

Delightful Daisy Birthday

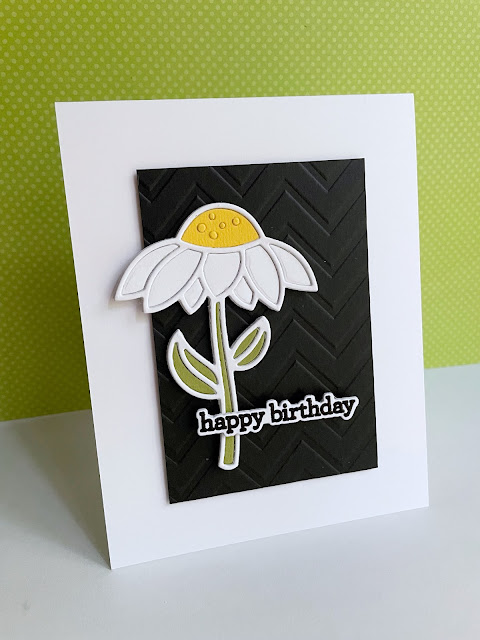
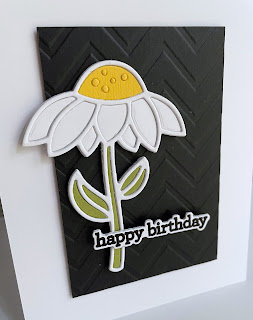
I love daisies.  Plain and simple.  They were a favorite of my mom and dad, and I think that that fact endears them to me even more.  When I saw the new Lawn Fawn Daisy die, I just had to have it, and have made a fun, quick, and simple birthday card with it!...
\
The daisy die is layered, and only yellow added for the center, and green for the leaves and stem.  I added the dots of an extra yellow center to give them just a little pop.  I adhered it to a remnant piece of embossed black paper, and used one of the CZ Design Silhouette Sentiments stamps and it's die for the sentiment.  I popped the panel up on a white card, and done!  I love simplicity, and this card makes me super happy!!  Cards that make YOU happy, are such fun to send to others!!  Here's a close up...
Such great fun, and you could definitely make the daisy colored and make it a coneflower, but it'll always be daisies for this girl:)!  
Thanks for stopping by!! Hugs!! Lisa

Saturday, August 21, 2021

Silhouetted Thinking of You Cards

I think the CZ Design's Silhouette Sentiments set is so pretty.  The stamp/die set is part of the Simon Says Stamp Make Magic release!  I have made two cards, both the same except for the background color, but I liked the first one so much, I couldn't resist a second...
I used a mask from the Simon A2 Masks stencils set...I LOVE these stencils!  The stencils have markings on them to show you exactly where to place your paper underneath the stencil for perfect centering, when you ink...ingenious!!  That makes it SO easy to mask perfectly!  I used three colors of ink and then stamped the silhouette over the masked inks.  I stamped the silhouette in my MISTI, and did have to stamp a second time to get a deep black, so I would recommend stamping with the MISTI for multiple stamping if necessary, and stamp the first couple times with scrap paper, to make sure the stamp has got ink on the whole stamp.   I added the sentiment from the set(love these sentiments!), and done!  Here's a close up...
The second one, like the first, but done with a solo blue distress oxide...
I just used one blue ink, and made the base a tiny bit lighter than the top, where I was heavier with the ink.  Here's a close up...
I'm not an expert when it comes to blending inks, but with the Simon brushes and the marked stencil...fool proof!!  I'm thankful for tools that help people like me, make cardmaking easier and fun!!
Thanks for visiting me today!! Hugs!! Lisa

Friday, August 20, 2021

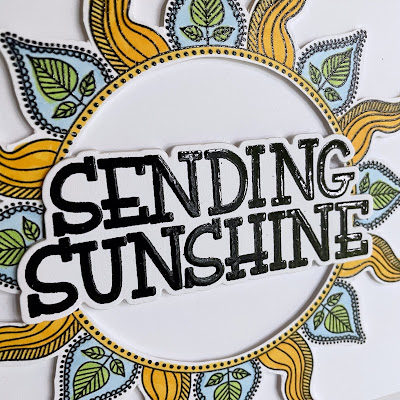
Sending Sunshine Mandala

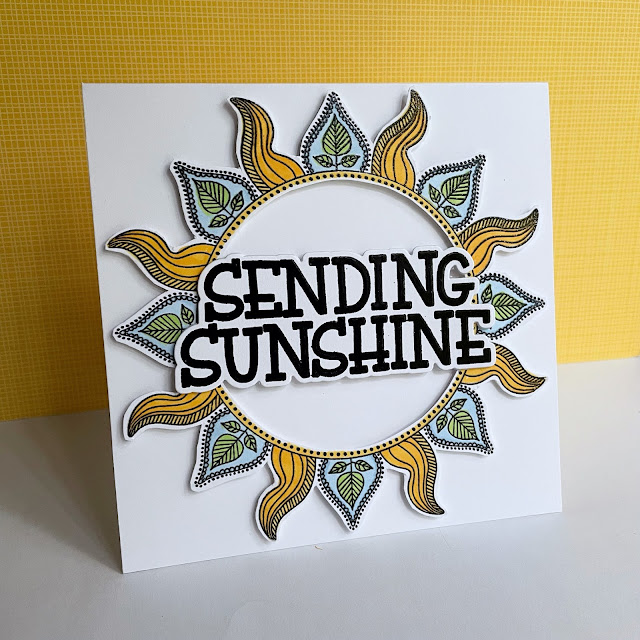
The Simon Says Stamp Sun and Moon Mandala cling stamp is so cool!  It is a three part large cling stamp from Simon's Make Magic release, and I have used the Sun part of the three part stamp, to make a card to encourage a friend!...
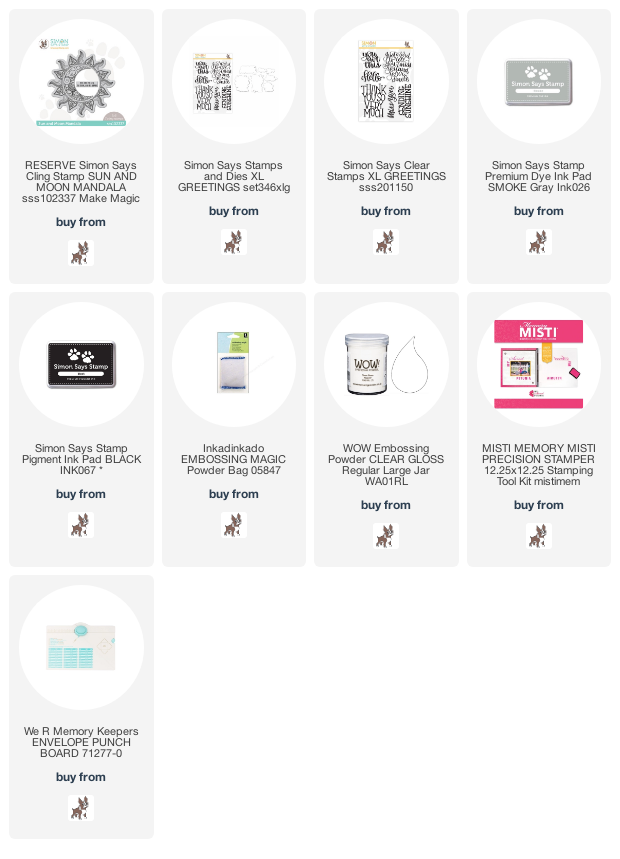
I stamped the sun mandala in my MISTI with Simon smoke ink to help me see where to color, then colored with two shades of yellow, a green for the leaves and blue for the background.  I then put the colored sun back into my MISTI, swiped with anti static bag, stamped with black ink and clear embossed.  I then cut it out.  I couldn't bear to miss out on even one of my colored rays of sun, so opted to make it a square card.  It's a tiny bit bigger than 5"x5", so I made an envelope for it, cut using some large thin paper, and my Envelope maker.  I chose an older Simon sentiment, I thought PERFECT for this sun and card, and popped the sun and sentiment up on the card.  Here's a close up...
So much fun, and it's a rainy day here in Virginia...this card makes me happy!
Thanks so much for stopping by my blog!! Hugs to you!! Lisa

Sunday, August 15, 2021

Petal Power

I've made a couple cards with the incredibly pretty and fun Simon Says Stamp Petal Power stamp/ die set from their newest Make Magic release, to share with you today!...
The first one is done in a rainbow of dye inks, layered twice and adhered to a stitched panel and a square card.  
On a side note...I discovered the other day, when ordering more stamps from USPS, that the stamps I purchase for using to send cards, that are for cards you don't want to go through machines, are actually for SQUARE cards...so...I am going to take advantage of making square cards on occasion, as I have a multi purpose stamp at my disposal!!  The stamp looks like this...
I was once told by a postal clerk that the bumps and raised edges on my cards required these stamps, but I like the fact that the cards I send hopefully make it through with less potential for damage, with these stamps, and I can send square cards!  
Back to the card...I used one of my all time favorite go-to sentiments (especially wonderful for the times we are continuing to go through, everyone could use some hugs and happy thoughts!).  I stamped with versamark and embossed with black embossing powder...I am really loving the deep black and shiny sentiments that are achieved this way!  Here's a close up...

The second one, with my love of daisies, I tried something a bit out of the ordinary with a set like this, I stamped and embossed all the designs on the petals white!...
I stamped the cardstock with versamark and embossed with white embossing powder.  I then stamped the middle circle stamp with yellow, and added a stem and leaves.  I decided on a slimline card, so I extended the stem die by only running the stem partially through from opposite ends with two runs under my Big Shot.  I adhered the flower and stem/leaves to an embossed piece of cardstock.  I opted for a black background to keep all the focus on the daisy and it's golden center, but wanted an embossed background for just a bit of interest!  I dotted the card with Tonic drops and added a lovely sentiment from the new Hibiscus Blooms stamp/die set!  Here's a close up of the patterned leaves...
Kind of different, right?!  Hey, I like different...different is good!   Hope you have had a great weekend, please stay safe!  
Thanks so much for stopping by today!! Hugs!! Lisa


Saturday, August 14, 2021

Have a "Ball"...

I used the new Simon Says Stamp's Game Day die set, from the new Make Magic release, to make a birthday card for a sports loving friend!...
I die cut and layered the various balls.  I must admit, I had fun putting these all together!  I combined the die cuts with two sentiments from the Simon set, What a Good Sport Summer.  I had to ask many family members if they "got" this card, when they read it...and each did, so hoping you will "get" it too!  I popped the panels on either side of the balls up with pop up tape.  Here's a close up...
Simply done, simply fun...had a ball!  
Thanks for visiting me today!! Hugs!! Lisa

Thursday, August 12, 2021

GIANT Happy Birthday

I've made a rainbow filled birthday card with the very cool new Lawn Fawn Giant Happy Birthday die...
I used 1/2" strips of cardstock adhered to a thin piece of cardstock and then die cut and layered.  What I LOVE about this die, is that it is SO wonderful all...by...itself!!  I added two little die cut and layered hearts to fill in the empty space on either side of the "day"...sort of gives a bit of continuity to the length of the other two lines of sentiments.  I used an embossing folder for my black cardstock(made by Darice, but I don't have a title)...liked that the surrounding paper has texture, and love black with rainbows.  Truth be told, I love black...with rainbow or whatever color!! I was going to put tonic drops around the sentiment, but this was a card, for me, where less was more...nope.  
 Here's a close up...
I love this die! This die, a birthday, and a rainbow...sheer happiness!!  Hope you are having a happy week...please stay safe!!
Thanks for visiting me today!! Hugs!! Lisa
Monday, August 9, 2021

Floral Border Stenciling

I have made a slimline card with the pretty new Simon Says Stamp Floral Border stencil, from their newest Make Magic release!...
I thought this stencil was so pretty, from the moment I laid eyes on it!  I also decided that the four petaled flowers were going to be daisies, from the moment I laid eyes on this stencil!  The only thing is...to make white daisies with a stencil means you have to brush the color onto a colored piece of cardstock, if you want the daisies to show!  I tried gray cardstock...nah...and then chose this very light blue...kind of gave it a sky kind of feel.  I used the amazing Simon Rainbow Blender Brushes to apply the colors to the stencil.  I first applied the white ink, then yellow, then the pink for the tulips.  After that, it gets a little tricky.  I masked all the flowers, and then blended the leaves and stems.  This is what it looked like after applying the green...
I added a CZ Design die cut sentiment, layered and with a border that matched the card.  Here's a close up...
The colors on this card are subtle, but I had such fun seeing my idea through to the end...anything for a daisy!!  Hope you're having a great start to your week!  
Thanks, so much, for visiting me today!! Hugs!! Lisa