Monday, November 29, 2021

Sparkly Merry Star

A simple and simply made Christmas card, with a sparkly look, made with a Simon Says Stamp stencil and glitter gel, from their Handmade Holiday release...
I put the stencil on a piece of black cardstock, used my spreader with some of the new gold Citrine glitter gel over the star.  I let the glitter dry, then added a layered die cut sentiment.  I cut the star down to a little over half, leaving for a strip of white on either side of the card, and popping the starred panel up on the card.  Here's a close up....
What a fun, easy, and pretty star card!  I LOVE using stencils...it's like getting a present when you lift the stencil up after putting ink or paste or gel over the stencil, and seeing what's underneath...such great fun!!  For those of you in the states, hope you had a great Thanksgiving...now it's on to Christmas!
Thanks so much for stopping by my blog today!! Hugs!! Lisa


Wednesday, November 24, 2021

Cozy Wishes

I've made a couple cards wth the beautiful new Simon Says Stamp Cozy Wishes stamp/die set, from their Handmade Holiday release!...
I think this set is SO PRETTY!   I had to wait til the dies came back in stock to order this, and had so much fun making my cards.  The cards are simple, and were easy to put together...that made the "making" even more fun!!  I stamped, die cut and colored the images with my markers.  I dotted the berries with tonic drops, and popped up on card(the background is a scrap piece of striped paper, as is with the second card),  I stamped the sentiment and die cut, popping that up over the image.  Here's a close up...
The second one, much like the first...
The only difference between the two, is that I chose to make this a more wintery card, as the sentiment kind of needed that!  I used an old and VERY loved snow embossing folder, and my white gel pen to add some snow to the roof and windows of the birdhouse!  I chose a bluebird, as they have always meant happiness to me..."the bluebird of happiness".  I did look up bluebirds and here's what I found when I googled:
The bluebird is a symbol of hope, love, and renewal and is also a part of many Native American legends. It symbolizes the essence of life and beauty. Dreaming of bluebirds often represents happiness, joy, fulfillment, hope, prosperity, and good luck.
Here's a close up...
I don't think I will be back on my blog until after Thanksgiving, so for those of you in the states, hope you have a wonderful Thanksgiving!  I am so thankful for my family, friends, and you.  Thank you to all of you, for coming to my blog and reading my posts, for leaving such sweet comments, for purchasing items that have inspired you through my links, for following me through the years...it all means so much to me, and I am very thankful.  Life is a challenge, but love and kindness make those challenges so much easier to face. Hope you find love and laughter through all the crazy of the upcoming season.  A quote I love:

“Everyone you meet is fighting a battle you know nothing about. Be kind. Always.”       
   Brad Meltzer

Happy Thanksgiving!  Love, 
 Lisa

Friday, November 19, 2021

Love at Christmas

I used a pretty new Simon Says Stamp embossing folder and cute stencil, from their newest Handmade Holiday, to make a Christmas card...
When I saw the Candy Canes stencil set, and the array of  candy canes coming together making a heart, I knew I had to make a Christmas card with them and a "love" sentiment in it!   I decided to stencil a couple of the canes and cut them out to make a heart, but thought some "shiny" would be fun.  So, I used my spreading knife with some Thermo Web Transfer Gel, and spread over the candy canes.  I let the gel stenciled canes dry, then covered them with red foil, ran them through my Glaminator, and cut out.  I popped them up over the embossed background, and added the "love" part of the "&love" sentiment from the CZ Design Peace and Love die set.  I die cut the sentiment from red metallic cardstock, so it's shiny, like the candy canes.  I cut the "&" off the die cut sentiment as well as it's background, and added a sentiment strip.  
Here's a couple close ups(so sorry, the true color and shine are kind of lost on pictures)...

Hope you have a great weekend!!  I have my outside Christmas lights up and running, and tonight it's The Santa Clause 1,2, and 3, on tv, so it's feeling like Christmas!!  
Thanks for visiting me today!! Hugs!! Lisa

Sunday, November 14, 2021

Metallic Rainbow Christmas

I have made a card with the wonderful new Simon Says Stamp Joy Peace Rainbow stamp/die set, from their new Handmade Holiday release...
Rainbows are one of my favorite things, so having a rainbow stamp/die set at Christmas, just absolutely "makes" Christmas for me!  I decided to go a bit untraditional with the colors, I love metallics at Christmas, and with three bands in this rainbow, and the three different sentiments on those bands, I got the idea to do three different metallics.  I used bronze (reddish) for the "love", silver for the "peace", and gold for "joy".  I stamped the background with Simon fog ink. Dry the background before attempting the next part...and then swipe with static bag...seriously...it will make this so so much easier to do!   I then cut the sentiment stamp apart, making it into three separate stamps.  I placed the "love" arc over the biggest band, put it in my MISTI, swiped the paper with my static bag, stamped the stamp with versamark and then bronze embossed.  Take time positioning the stamp, as it will affect not only it's position on the rainbow arc, but the other two, as well. I then put the "peace" band up next to the "love" band in my MISTI.  Once I had it positioned, I REMOVED the "love" band, brushed the paper with my static bag, stamped the "peace"with versamark and silver embossed.  I repeated the same for the last "joy" band.  I die cut the finished rainbow(love the little cut ins with this die!), layered once and popped up over a stamped and gold embossed sentiment from the set.  I popped up the panel on a stripe embossed fog colored panel and then card.  Here's a close up...
A metallic rainbow...this made me happy!  Hope you're doing something that makes you happy, today!!
Thank you so much for visiting me!! Hugs!! Lisa

Saturday, November 13, 2021

Berry Branch Christmas

I have made a very simple card with the beautiful Simon Says Stamp Etched Berry Branch die from their Peace on Earth release, and a CZ Design sentiment...
This branch is so beautiful!  I don't think it needs another thing but a sentiment to show it's beauty, so that's how I have chosen to make this card.  I die cut the branch from watercolor paper, but colored with markers, after opting not to paint. I put one layer behind the colored leaves and berries, and gently folded the leaves just a bit to give them some added dimension and interest to the simple design.   I used Nuvo drops on the berries for detailm and stamped the sentiment with versamark and gold embossed.  I popped up the panel with thick 3D dots, and done!  Here's a close up...
Hope you are having a great weekend...I'm watching Hallmark movies, with a cup of coffee in my craft room....so much fun!!!
Thanks for stoppping by!! Hugs!! Lisa

Thursday, November 11, 2021

Handmade Holiday Blog Hop!

I am so happy to be a part of today's Simon Says Stamp Blog Hop over at the Simon Blog, celebrating their newest release, Handmade Holiday!  There are so many wonderful stencils in this release, as well as new beautiful glitter gel!  I chose the wonderful new Layered Holiday Grid stencil set to make a couple cards to share with you for today's celebration!...
I used Pixie spray on the back of the grid stencil, to help it firmly stick to the cardstock as I brushed the ink onto the paper.  The cool thing about this spray is that the stencil will come off the cardstock as soon as you're finished!  I used black ink and after it dried, I began using the pretty glitter gel, to fill in the squares with the other stencil from the set.  I used my Eclipse tape to mask off the areas I didn't want gel, and used one color at a time, allowing each gel to dry before using another one.  So, it took three attempts to get all the glitter onto the squares.  This was SO MUCH FUN to work with and to do!  Seeing the different colored glitter after each time I would pull up the stencil was sheer happiness!!  After I was finished, I popped up the panel onto my card and done!  I have to say, the glitter against the black and the intensity of the shine is lost on these pictures!  Much like metallic paper, it would seem that it's hard to photograph glitter, but let me tell you...it's sooooo pretty!!!  Here's a close up...
The second one, has squares that were actually the first ones I made...and this one needs explaining...
I was intent on making the black ink pretty black in the squares.  To do this, I thought I would stamp my blending tool onto the stencil, rather than brush it on.  What happened, by doing this, is that the ink went beyond the stencil and gave the squares ends that look a little jagged.  I originally dismissed it, but then kind of liked the more rustic look that the ends gave the squares, and the fact that the jagged ends showed on ALL of the squares, rather than just on some, made me think that making a card of these squares was not out of the question, and would be kind of cool.  SO...I used the other side of the stencil for the images and sentiment,  and then a few of the images for an extra line of squares above the "JOY", and done like the first...such fun!!  And I am so happy I got to use what I thought I would throw away, to make another wonderful Christmas card!  Here's a close up...  
I've had fun making my cards, but the fun is just beginning for you!
Simon is generously giving a $25 coupon to every stop on the hop from our comments section, so if you leave a comment, you have a chance to win!  The winners will be posted on the Simon Blog on Wednesday, November 17th, so make sure you check the blog on the 17th, to see if you're a winner! 
The list of participants for today's blog hop are below:

Simon Says Stamp Blog

Nina-Marie Trapani

Caly Person

Nichol Spohr

Jennifer McGuire

Cathy Zielske

                                          Lisa Addesa<------ YOU ARE HERE

Amy Rysavy

Sidnie Des Jardins

Heather Ruwe

Suzy Plantamura

Yana Smakula

Heather Hoffman

Lea Lawson


Before I go...two things:

Don't forget the offer in the banner at the top of my post!  Simon is offering a free Salvaged Patina Distress Oxide Ink during this blog hop, with ANY purchase!  Just use the code HDMADE4U to get your ink pad!  Just remember, the offer is only good until the end of the day on November 14th OR until supplies last!

Second...there is another blog hop tomorrow!  So please visit the Simon Blog tomorrow for another day of celebration and inspiration!

Keep on hopping!! Hugs!! Lisa

Wednesday, November 10, 2021

Handmade Holiday Release

Today, there is a new release at Simon Says Stamp...the Handmade Holiday release!  This release is filled with all kinds of goodies that will help you create handmade treasures for this Christmas season!!  There are many beautiful embossing folders in this release, my card today was made with one of them!...
I embossed the Holly Branch embossing folder on a piece of watercolor paper.  I then used three colors from my watercolor paints and painted the leaves, branch and berries, along with another swatch of watercolor paper to use to die cut the sentiment.  I then put the dried, painted branch back into the folder, and through the machine, again, to the most defined lines from the folder after painting.  I added the die cut and layered sentiment die, and adhered to a card.  Here's a close up...
I'm not a great painter, but I thought this was a kind of wistful, rustic look, and it made me happy!  Such great fun!!  A link to the release is below, hope you will check it out...lots of very fun stuff to be had!  There will be two blog hops, tomorrow and Saturday, hope you will check out the Simon Blog to get some inspiration!  
Happy Crafting!!  Hugs!!  Lisa

Monday, November 8, 2021

Givingthanks at Thanksgiving

Super quick post with a Thanksgiving card to share with you!  I made this with the new Simon Says Stamp Thanksgiving die set from their Peace on Earth release...
This card was fun and simple to make!  I cut 6 strips of cardstock in Thanksgiving kind of colors.  I adhered them to lightweight paper, and die cut the background of the sentiment die from the strips.  I die cut and layered the acutal sentiment.  I then die cut two of the pretty new Delicately Leafy Branch die, and used one for above and one below the sentiment.  I used the Simon Strips 1 die to emboss lines on the cardstock, then adhered the sentiment and leaves to the striped background, and then to the card.  I also bent some of the leaves to give them some added dimension.  Here's a close up...
Simply simple, and I think pretty pretty....oh, I'm so funny!!
Thanks so much, for stopping by today!! Hugs!! Lisa

Sunday, November 7, 2021

Tiny Dancer

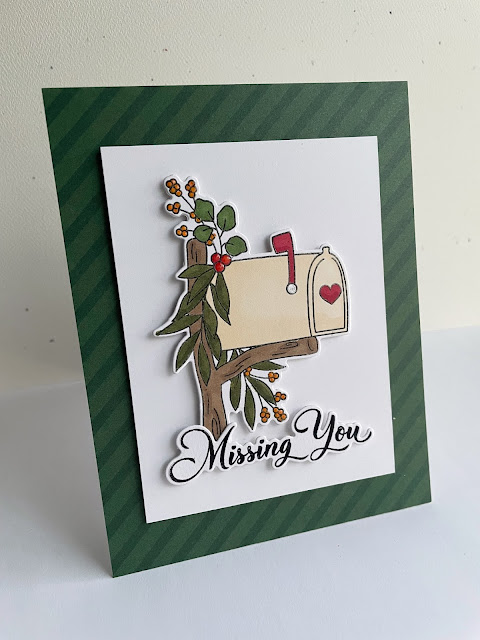
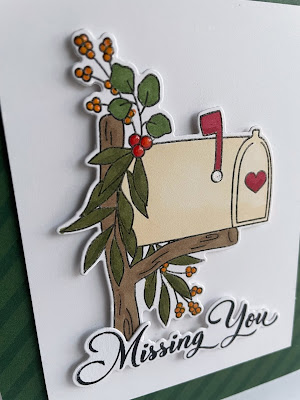
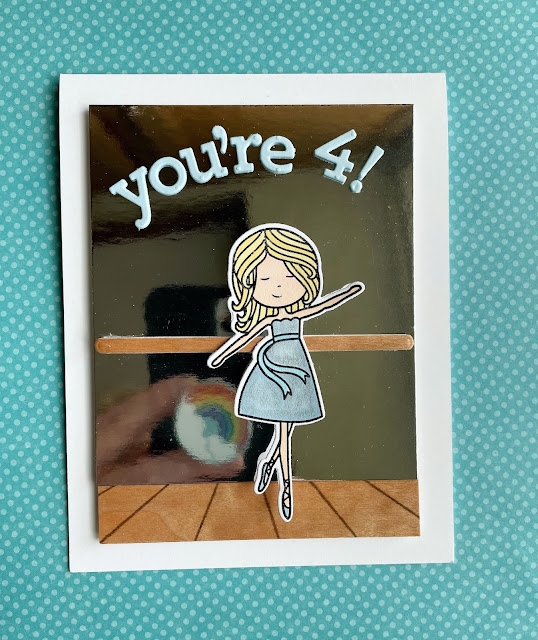
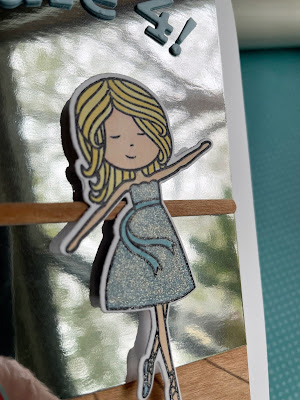
I have had a thought...a vision, for literally a couple months, of a birthday card for my granddaughter, 
made with the adorable 
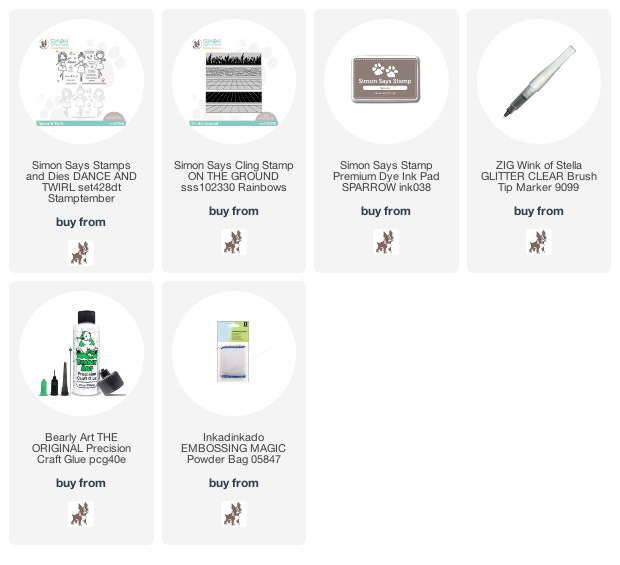
Simon Says Stamp Dance and Twirl stamp/die set...and with her birthday a handful of days away, I finally made it work!!...
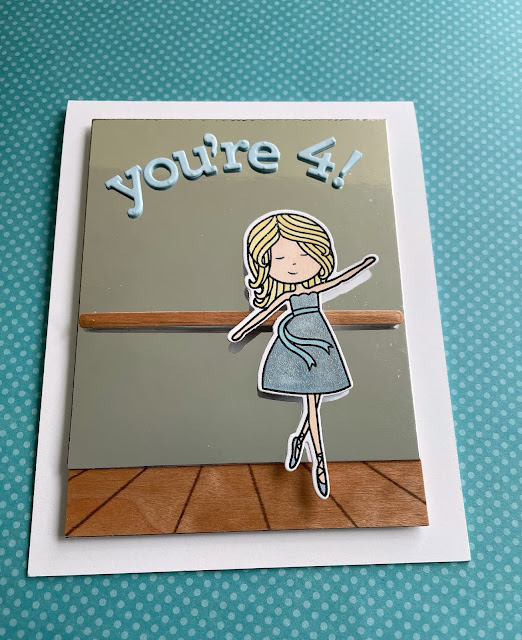
I took ballet lessons when I was little and remember walls lined with mirrors, wooden bars along those mirrors, and wooden floors.  I used some really shiny silver cardstock for the mirrors...and the photography really suffered because of it, but hope you get the general gist of this card, despite the shiny paper.  I used wood veneer cardstock for the bar and floor, which I stamped with the Simon's On the Ground cling stamp.  I extended the bar die cut to be a bit longer.  I stamped, embossed, die cut and colored the dancer, and here is where I had such a problem.  I wanted her to move(dance) along the floor.  I love to send my grand babies birthday cards that have movement!  I have slider dies, but I didn't want the slider to really show, and the only spot wide enough on this pretty little girl to adhere a penny and such, is on her dress, which would really show, it would compete with the bar.  I finally came up with the solution late last night...
 I put two THICK glue squares on the dancer'sback...one was almost full size, the one on top, about 1/2.  I hand cut a really thin piece of foam to put behind the bar, and adhered to the bar with glue.  I put the bar between the squares on the dancer, and brushed the bar with my static bag to powder it a bit for easier sliding.  I took the coverings off the glue squares, and put a strip of paper over them connecting them over the bar.   I then adhered both ends of the bar onto the shiny silver with glue for good securing, and my dancer now dances!  She will slide on the bar between the glued ends...

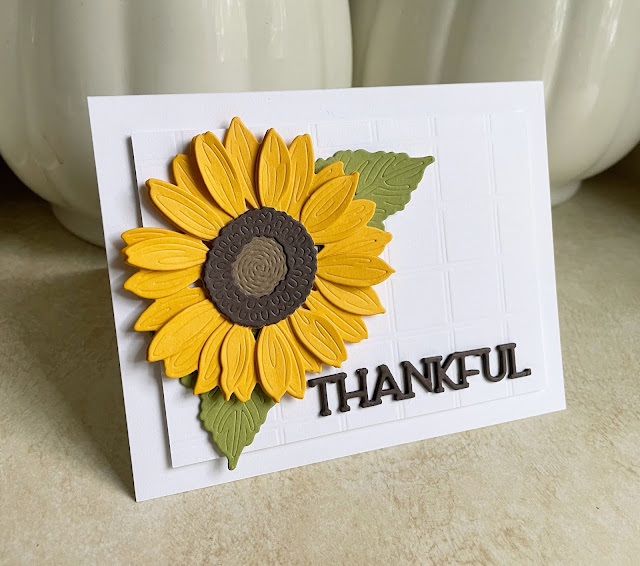
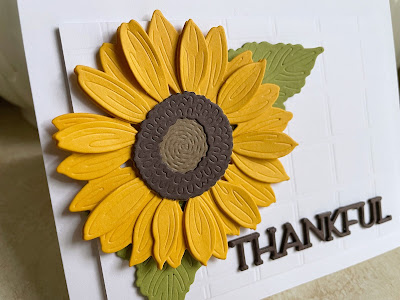
I used the CZ Design Archie Jr Solid letter dies(sorry, seem to no longer be available😞) layered, for the sentiment.  I did get kind of tired trying to get photos of this card, having the "mirror" background, so I gave up and just took pics.  Please try to see just the card😄😄 
I brushed her dress with my Wink of Stella brush to give her some glitter...
I am so happy to have had this card finished...unfortunately, figuring out the photographing was just as frustrating as figuring out how to get my desired finished card, but fortunately, both got done!! In the mail tomorrow...
Thanks for visiting me today!! Hugs!! Lisa

Saturday, November 6, 2021

Sunflower Love

I used the Honey Bee Lovely Layers: Sunflowers dies and a die from Photoplay's Thankful Thanksgiving die set, to make a card for this season of thanks...
I have had both sets of dies for a while, but took them out to play last night and put together this card..super quick, easy, and fun!!  The embossed paper was a scrap, but embossed with an old Papertrey Ink Impression Plate(Guide Lines Grid).  I LOVE this sunflower!!  So pretty and once I figured out how to put it together, realized that it was more amazing than I had first thought.  There are three layers, and each one builds upon the one below.  There are unembossed petals on the bottom two levels, and are meant to line up with embossed petals on the layers above.  It's all about alignment with this die...so cool how they made it a no fail die...you can't go wrong as long as you line it up!  Way cool!!  I bent some of the leaves with my fingers for added dimension.  I added two die cut leaves, and a layered die cut sentiment(love the font, lines, and size of this die!), and popped up the flower, and then the panel on the card...done!  Here's a close up...
Hope you have a great weekend...just turned my heat on for the first time since Spring, a couple days ago...Fall is really here in VA!  
Thanks for visiting me today!! Hugs!! Lisa

Wednesday, November 3, 2021

Snowflake Edges

A quick card and post today!  I used the really pretty new Simon Says Stamp Snowflake Edges stamp set from the Peace on Earth release, to make a Christmas card...
I am loving black/white/gold on Christmas cards....this is another one!  I positioned two of the snowflake edges in my MISTI, on a piece of black cardstock, on a slight diagonal slant,  so that the end of  both the borders were equidistant to the edges of the card and to each other, positioning the sentiment in the middle as well.  I then put the card into my MISTI, removed the sentiment, and put the lid down, to attach to the positioned snowflake borders.  I ran my static bag over the cardstock, and stamped the borders with versamark and white embossed.  I cut the sides off each side of the stamped flakes, to the tips of the border.  I then cut the center ends.  I laid the top and bottom black pieces on a card, and then put the sentiment stamp on the card between the black pieces.  I removed the black pieces, leaving the sentiment stamp, and put back in my MISTI.  I stamped with versamark and gold embossed.  I popped up the black panels onto the card and done!  Here's a close up...
Super CAS, but I love it's simplicity...it's simply pretty!  Hope you are having some wonderful first few days of November...happy creating!!
Thank you so much for visiting me today!! Hugs!! Lisa