Tuesday, May 31, 2022

Orange Blossoms

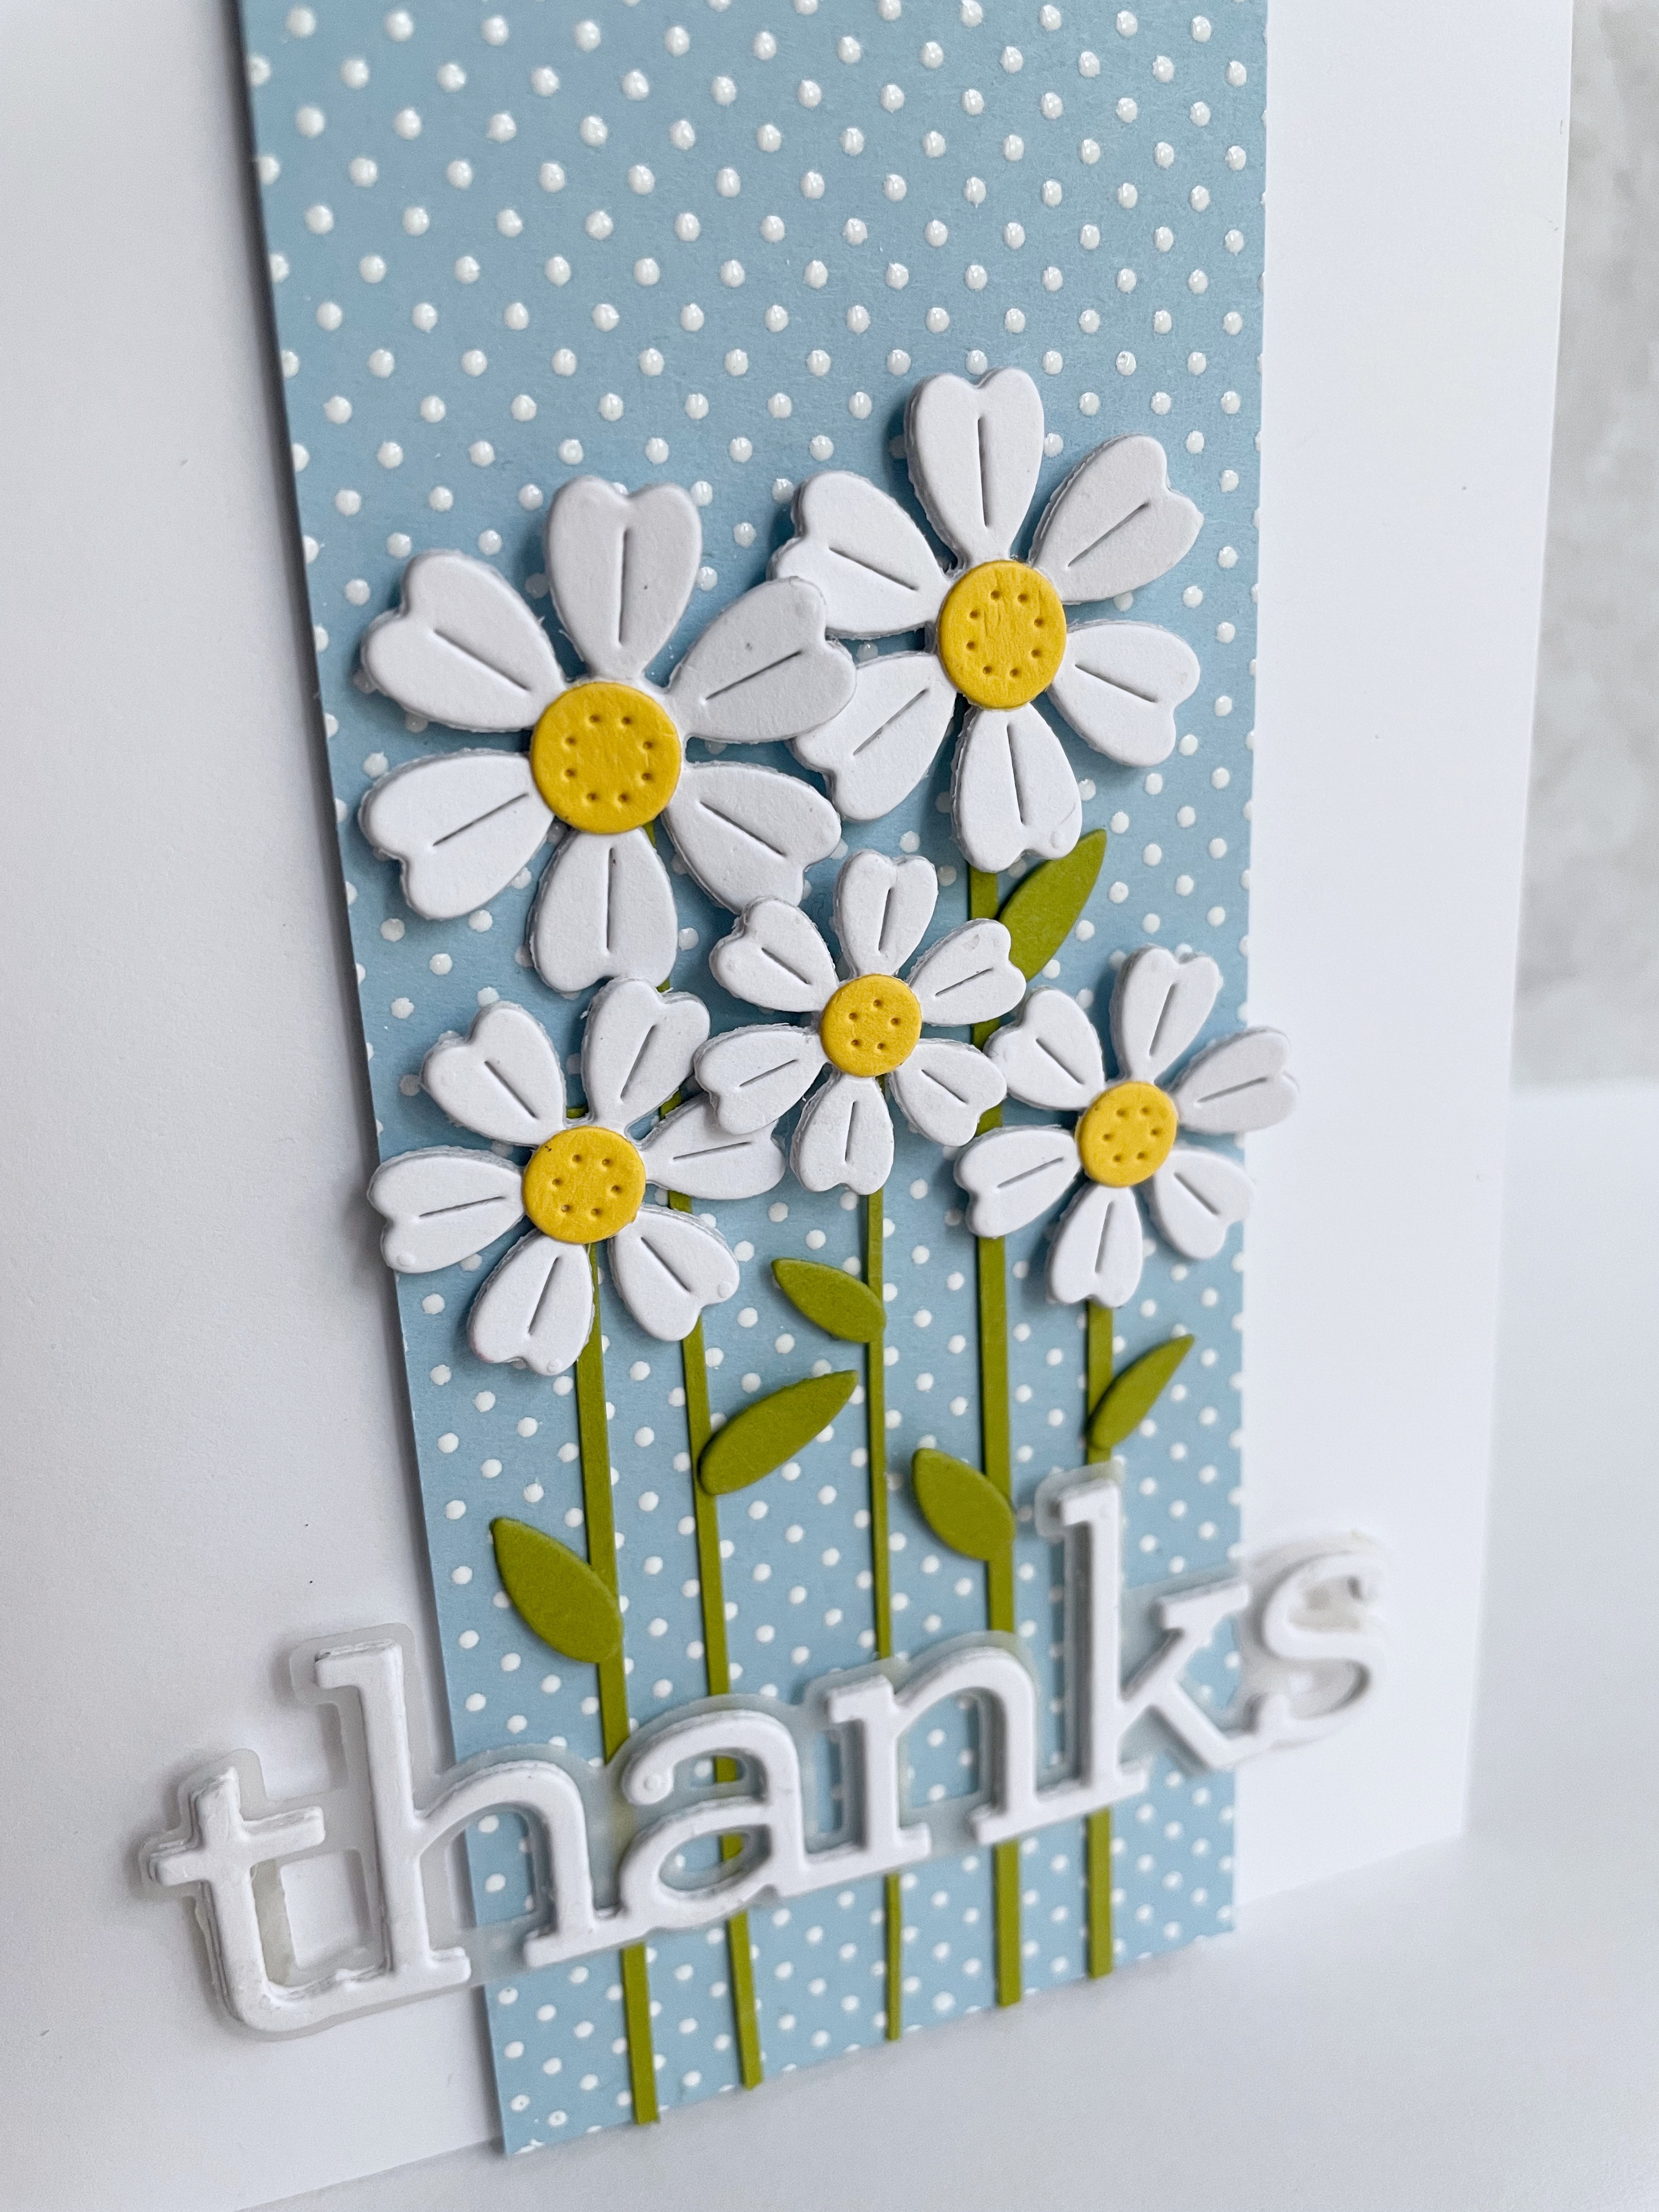
I have made a card with the very cool and super pretty Simon Says Stamp Orange Blossoms stencil AND die cut set from their new Yay You Release!...
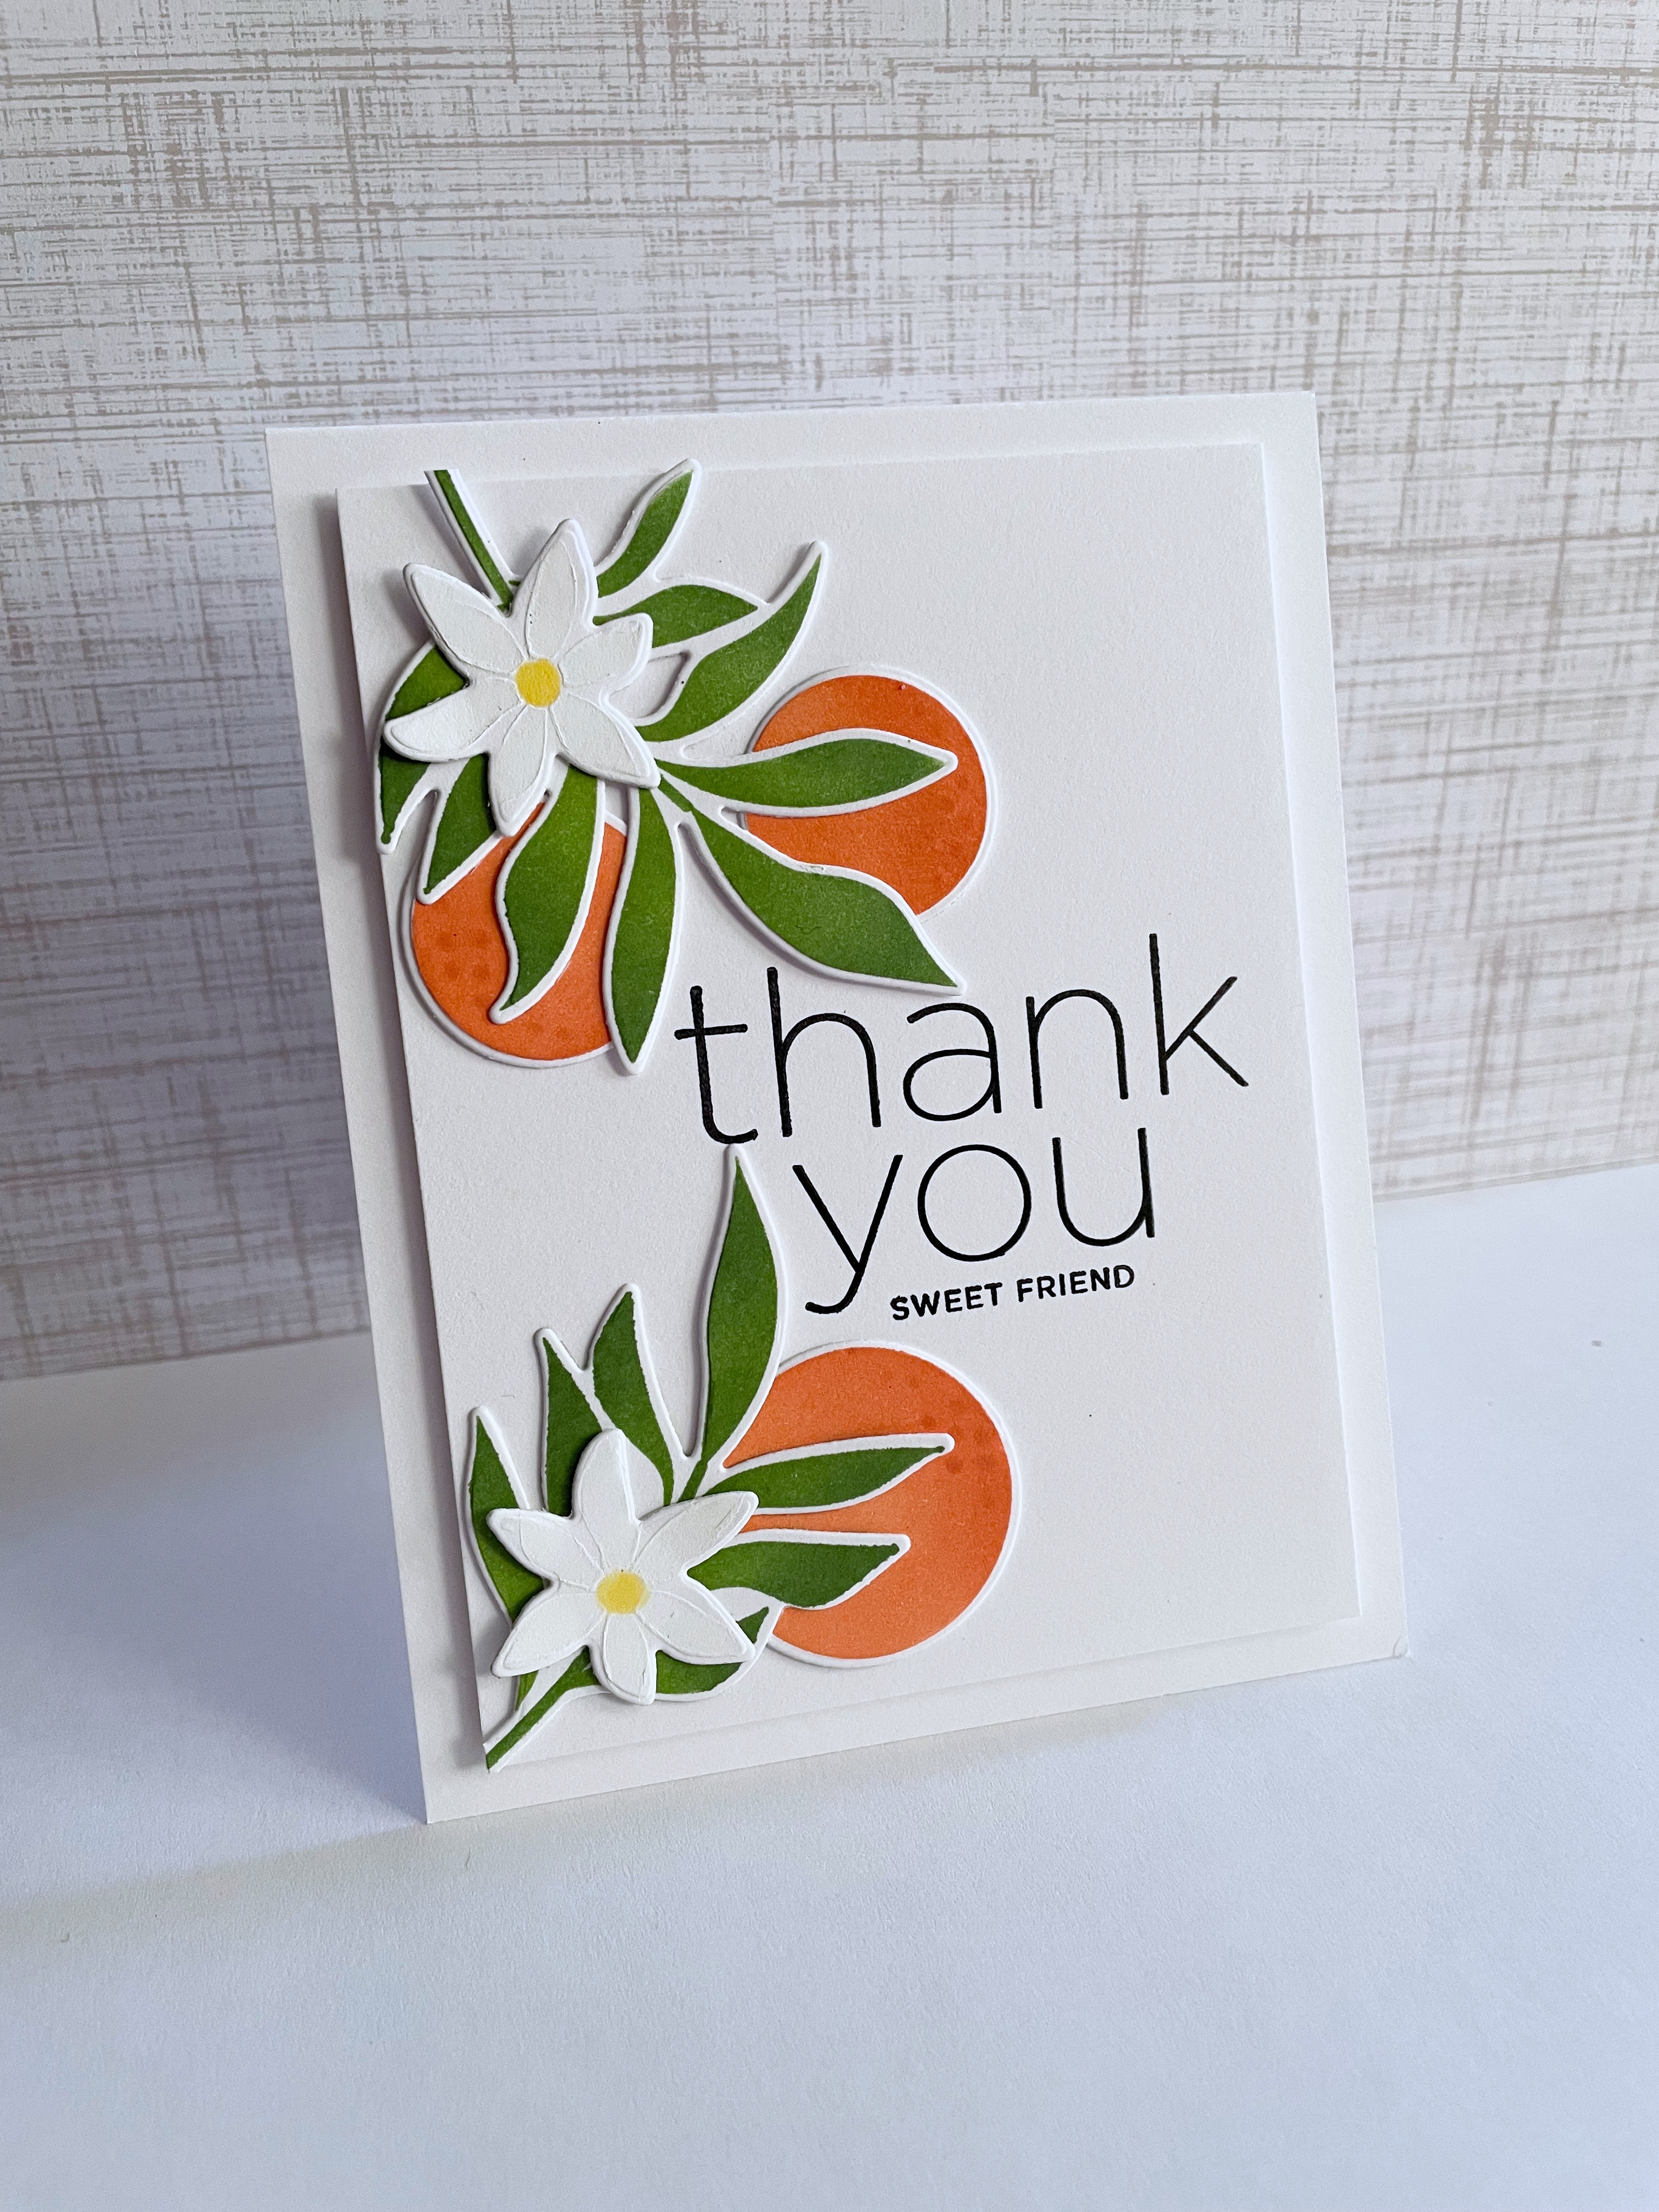
Okay, this is a first for me, a stencil and die cut set!  I must admit, I was very intrigued and yet a bit intimidated when I first saw it!  But it all came together so effortlessly and easily...let me tell you, this set is SO MUCH FUN to create with! I loved the thought of pretty stenciled leaves, that could now be die cut...way cool!!  I brushed on color for the leaves with two shades of green, the oranges with one color of orange, and white pigment ink for the flowers, with yellow for their centers.  I die cut them, and had more die cuts to layer each with, but opted to just do a single layer for all three.  I used an older CZ Design sentiment set with a small sentiment that just "fit" these oranges.  I popped the panel up on the card, and done!  Here's a close up...
I hope I see more stencils and die cuts...so...much...fun!!  Hope you are having a great week!
Thanks for stopping by today, I really appreciate it!! Hugs!! Lisa

Monday, May 30, 2022

Flower Filled Paint Brush

I have made a card with the wonderful Spellbinders Painted Blooms die set that I have had for a while, but finally made some time to play with...
I made this card with no particular recipient in mind, until my granddaughter saw it while facetiming one morning.  When she last visited, she was enamored with the paint brushes I had(I have been trying to get a bedroom finished for a while, now!).  She loved this flower filled paint brush when she saw it , so I finished it with her in mind.  I die cut all the various pieces, adhered them together, and finishing it, decided to put some bristles on the back side, as well as the brush parts, so my granddaughter can take it off the card and carry it around.  The pictures below show the front and back(the picture was taken on my puzzle mat that had alot of puzzle dust on it).  The back has three glue dots that I put on it, to keep it adhered to the card.  
I couldn't find a sentiment that fit what I wanted to say, so I made my own.  I used the Noteworthy font on my Microsoft draft, and printed it off with my cardstock. Isla DOES add such wonderful color to my world!   I added some Tonic Jewel drops, and popped up on card      
                           
I LOVE this Spellbinder set...such a wonderful, realistic and pretty-with-the-flowers paint brush!
Thanks for visiting me today!! Hugs!! Lisa

Thursday, May 26, 2022

Plant Lover's Birthday!

I made a birthday card for one of my daughters! Both my daughters LOVE plants, and this wonderful stamp/die set by Gerda Steiner is PERFECT for a plant lover!!...
As soon as I saw this set, I knew I had to have it...the plant images are so wonderful, and so like the plants my daughters collect and love!  I stamped, embossed, die cut, colored, layered, then popped them up on a cut panel. Between the two cut panels, I stamped the Simon Says Stamp Happy Birthday sentiment and added a really thin black border on top and bottom of the sentiment.  I also embossed the panel with a very old Papertrey Ink Impression plate, Canvas/Linen to add some interest.  Here's a close up...
I had so much fun making this...have another month til I will need another plant card for my other plant lover!  Can't wait!  
Thanks for stopping by today!! Hugs!! Lisa

Wednesday, May 25, 2022

Spring Daisies Thanks

I have made a thank you card with the flowers from Lawn Fawn's Spring Flowers Backdrop Die set...
I hope to make a card with the entire frame, but had die cut the flowers and that was as far as I got.  These flowers have sat on my desk for WEEKS..first as die cuts, then I took and adhered them together and then had layered flowers(daisies).  I needed to do something with them, so here we are!  I cut strips of green for the stems, and made the leaves from an unlikely source...an old Paper Smooches die...
...the CENTERS of the loopy leaves...go figure!  This die happened to be on my desk, as well...for a LONG time...funny how things go!  I then added a die cut and layered CZ Design Thanks with a vellum background.  The blue cardstock I used a MFT Stamps polka dot background stamp, versamarked and white embossed.  Here's a close up...
I love being able to use things just laying around and make something of them, despite having different intentions!  I have a whole box of leftovers....might be making some cards with those, too!  Hope you have a great day...the week...the month...is flying by!!
Thanks for visiting me today!! Hugs!! Lisa

Sunday, May 22, 2022

Sketched Leafy Wreath

I have used the beautiful new Simon Says Stamp Sketched Leafy Wreath hot foil plate/die set, from their latest Yay You release, to make three cards celebrating three different occasions!...
This first one I made a bit ago, but since making it, I have taken it apart and redid the background.  I hot foiled the wreath with silver foil(foil from the glimmer system),  and then die cut and colored with my markers.  I layered it, and added a stamped and silver embossed Simon sentiment.  Instead of the original...
...I decided on a plain white background, and used a Simon Thin Frame rectangle die to emboss the rectangle onto the card panel.  I like both, but am in a "go whiter" mood these days!  

The second one, a card for Fall...
I used different foil, gold(the foil is from the glimmer set), and different colored markers.  This time used a CZ Design sentiment die, die cut in gold and layered.  I used the same A2 thin rectangle die, this time rather than emboss, I die cut and layered the die.  Super simple!  

The third one, for Christmas!...
I used gold foil for the wreath, again, and colored with green markers.  I die cut the "rejoice" in gold and layered.  I made enamel dots (squirting the dots onto a piece of acetate, and then used a razor to remove.  I then adhered to wreath.) with some old Ranger enamel accents.  It doesn't appear they make this any more, but I've listed something below, also made by Ranger's Wendy Vecchi that might be similiar.  I chose to make this a square card.  I adhered the wreath to a white panel and then popped up on a gold panel and card. 
Just love this die, and it's versatility...lots of fun making these cards!  
Thanks for visiting me today!! Hugs!! Lisa

Thursday, May 19, 2022

Yay You Cards!

I used the cool new Simon Says Stamp Arches Background Cling stamp and CZ Design's Yay You die, both from Simon's new Yay You release, to make a couple cards of encouragement!...
Last night, I was in an ink blending mood.  I wanted to make a card to encourage and commend  an amazing young man, and knew I wanted to blend blue ink, but wasn't sure if the aqua or sky hues. So I made both!  I started out with the aqua shades!...
  For both cards, I rubbed my static bag over my cardstock, stamped the background stamp with versamark, and white embossed.  I used my three shades,  blending a section of the cardstock with each of the the three shades over the embossing til happy.  I did rub a paper towel over the panel after finished, to remove any excess ink on the embossed white...DEFINITELY makes a difference!   I cut it down, popped it up on the card, and added a die cut and layered Yay You!  I also added a small CZ Design sentiment strip under the die cut, and done.  I had made jewel enamel drops to add on, but being this is for a guy, I just wasn't feeling the bling.  Here's a close up...
But, as I stared at the finished card, I just wasn't sure if I should have made the card with the bluer shades, so the second card happened...
I made it the same way as the first, except with different blues, and a different sentiment strip.  Here's a close up...
I'm liking the sky blue shades, over the aqua shades...such great fun!!  Hope you are having some fun today!!
Thanks for stopping by today!! Hugs!! Lisa

Saturday, May 14, 2022

Stitched Alphabet Thanks

I have used six of the cool new Spellbinders Stitched Alphabet dies from their new Stitched Alphabet collection, to make two thank you cards...
This first card I used white cardstock with black floss to stitch my letters.  I die cut four of each letter, and only added adhesive to the ends of the letters where there was no stitching.  I stitched all the letters while I was talking to my sister, yesterday morning!😊  I used the borders of the letters to cut out a panel-long border for the letters.  I popped up that panel on a piece of rainbow paper and then onto a card.  Here's a close up...
The second card, I put the letters side by side and did not stitch them...
Again, I die cut the letters four times each, the top layer the only one with color...I used paint chips for each letter.  I just wanted you to see how I cut the frame out for the letters...
I die cut each letter from printing paper, then lightly adhered them to the piece of cardstock that I want for my card, placing the letters just where I would like them to be on the card.  I then used three of the six borders, adhered them over the letters on the cardstock and die cut them.  I then used the other three dies, and die cut the remaining three letters, and a really cool border is created!  I then ran it back through my Big Shot with a piece of burlap over it and the panel had texture!  Then, I popped up the cut out panel, adhered all the letters in place, and added the sentiment below and done!  Here's a close up...
I had so much fun with these dies...stitched or not stitched...fun!!  Hope you have a great rest of your weekend!!  
Thanks for checking out my blog today!! Hugs!! Lisa

Friday, May 13, 2022

Dancing Butterfly Birthday

I have used the beautiful new Simon Says Stamp Dancing Butterflies Hot foil plate and die set, from their new Yay You release, to make a birthday card...
The only problem with making a card to show you with not only hot foil, but silver embossing, is that they are hard to photograph, which is why I took a pic at another angle...
This card was simply made hot foiling, die cutting, coloring with markers, and layering the butterfly.  I purchased a hot foil machine, and have been having SO much fun using it!!  I did not purchase the whole sysem, after I heat the plates, I run them with the foil and paper through my Big Shot...it works just fine!  I used three different sentiment stamps in my MISTI to stamp the sentiment for the card (using my static bag before stamping), and then silver embossing.  I thought the sentiment went so well with all the shiny of the butterfly and sentiment!  I know this card is super simple in design, but this card has made me really happy!!  Here's a close up...
This card is happiness to me...simple, lovely, wonderful happiness!  Hope you have a great weekend!!
Thanks for visiting me today!! Hugs!! Lisa

Thursday, May 12, 2022

Yay You Blog Hop!


Yay me, I'm so happy to be a part of todays Simon Says Stamp Yay You Release celebration over at the Simon Blog!  There are so many wonderful new products in this release, and I am so excited to share the cards I've made with you from the beautiful new Intricate Floral Background Hot foil plate!...  
This first card is simply made using the plate, gold foil, and a layered Simon sentiment die.  Black, gold, and white are so pretty together, so my thought was, why not hot foil the plate with gold foil on black cardstock, and frame in white with a white sentiment...LOVED!!  I simply added the sentiment, popped up on white card, and done...super simple...but loved this simplicity!  
Here's a close up...
 

The second one, I did much the same as the first, but gold on white cardstock...
I used a different sentiment this time, die cut in gold and layered.  I framed it in gold and done!  Here's a close up...

Then, I thought...hmmmm.....what if I color a white background and the flowers/leaves??...
I colored with markers, it took a bit of time...but it was fun!  Hey, coloring is always fun...and relaxing!!  I used, yet another Simon Happy Birthday die...die cut and layered in white, thought this one went so well with this version!  Here's a close up...
I LOVE the diversity of this plate...there are so many ways to use it...and with hot foil, simple or more involved...the gold foil makes a card SO pretty!!
I had such fun making my cards...my fun is shown above, your fun begins below!
Simon is generously giving a $25 coupon to every stop on the hop from our comment sections, so the more hop blogs you comment on, the more chances you have to win!  Winners will be chosen and posted on the Simon Blog on Wednesday, May 18th, so make sure you check the Simon Blog on the 18th, to see if you are a winner!!  

The list of participants of today's hop are listed below:

Simon Says Stamp Blog   

Nina-Marie Trapani

Caly Person

Nichol Spohr

Cathy Zielske

Suzy Plantamura

Sidnie Des Jardins

Lisa Addesa

Keisha Charles

Heather Ruwe

Anna-Karin Evaldsson

Mindy Eggen

Barb Engler

Cheiron Brandon

Yoonsun Hur


A couple things before I go...don't forget the offer in the banner at the top of my post! Simon is offering the beautiful Beautiful die with any $25 purchase!  Simply use the code BEAUTY when checking out, to get this gift!  Just remember, the offer is only good until the end of the day on May 15th,  OR until supplies last!

Second...there is another blog hop tomorrow!  So please visit the Simon Blog tomorrow, for another day of celebration and inspiration!

Thank you so much for stopping by, and keep on hopping!! 

Hugs!! Lisa

Wednesday, May 11, 2022

Yay You Release!

The Simon Says Stamp Yay You release is out today, and I have made a card to share with you, with one of the wonderful new stamps!...
I have used the new Arched Greens Cling stamp...and oh what fun this stamp is!  The center of the stamp can be removed, and stamped separately...which is what I opted to do!  I put the center stamp into my MISTI and began stamping everything individually.  I stamped the border and the stem with versamark and black embossed.  To do this and all the leaves, I used scotch tape to mask everything I did not want to be inked.  After embossing the black, I put the paper back into my MISTI, and masked the leaves(and some of the border each time) to stamp each leaf with color and press onto the cardstock.  After all the leaves were stamped, I removed the stamped paper piece, and die cut it with one of the Simon Domed Arches.  I stamped the rest of the Arched Greens stamp with black ink, and popped up the colored piece on top.  I added a die cut, layered and clear embossed happy birthday...it fit perfectly in the image!  
Here's a close up...
I hope you will check out the new release over at Simon...and there will be two days of hops over at the Simon Blog tomorrow and Friday...hope you will check them out for lots of inpiration with all the wonderful new products!  
Thanks for visiting my blog today!! Hugs!! Lisa