Thursday, August 31, 2023

Stenciled Happy Birthday

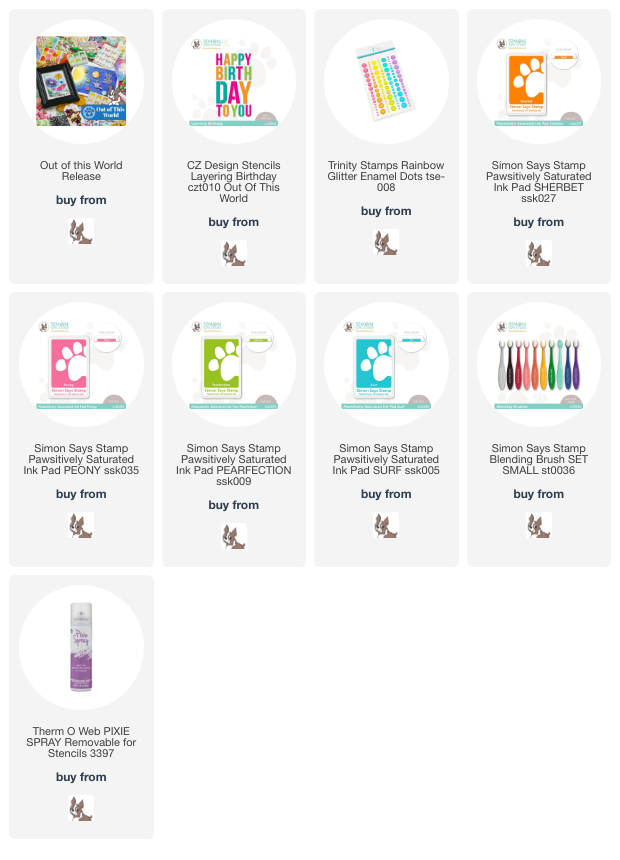
I've made a birthday card using a cool CZ Design stencil set, from the the Simon Says Stamp Out of this World release!
This is a four part stencil, so I used four colors of ink to fill in all the letters.  I then used some sparkly enamel dots to give the stenciled panel some bling!  I did use some stencil spray for the "A" in DAY, to keep it adhered to the cardstock...just an FYI...makes for much better and easier stenciling with the pieces of the stencil that move easily to be pasted down.  Here's a close up of the finished panel...
I just realized as I was linking my supplies for this card, that my card is the exact same colors as the sample on the website...well..what can I say...great minds think alike??!  I think if you have four colors to work with for a birthday, pink, orange, green and blue are pretty "go to" colors....l love the colors, what can I say??!
This was my last quick card before tomorrow's Simon Says Stamp STAMPtember® release...🎵see you 
in STAMPtember®ðŸŽµðŸ˜ŠðŸ˜Š!!
Thanks for visiting me today!! Hugs!! Lisa

Wednesday, August 30, 2023

Teacher Thank You

I have used the fun Simon Says Stamp Layering Apples Stencil set, from their Just a Note release, to make a thank you card for a hard working teacher!...
There are four stencils in this set, and I used four inks for the four different stencils.  I added the teacher sentiment die cut, layered, and a sentiment strip below it.  I also added some Wink of Stella glitter to one side of the cut out and popped up apple sitting on the sentiment, for some bling.  Here's a close up...
Looking forward to the weekend...STAMPtember® is happening in TWO DAYS!!  
Thank you so much for visiting me today!! Hugs!! Lisa

Saturday, August 26, 2023

Rainbow Sunshines

I have made a couple cards, almost identical (will explain later), with the very cold Simon Says Stamp Sunshine Background cling stamp!...
Okay...I have to tell you upfront, I LOVED playing with this stamp!!  I love puzzles, so this was alot like making a puzzle.  Each of the pieces of the "sunshine" disconnect from each other, which makes it like a puzzle to create with.  I took the pieces around the one I was coloring, to make it easier to only get one piece inked at a time.  I colored my sunshine in a rainbow of colors, and used a sunshine sentiment that fit perfectly in the sunshine's center!  Here's a close up...
The sunshine in the second one is exactly like the first, the sentiment being the difference...
This second card was actually done before the first card, but the yellow ink somehow messed up just a tiny bit on the end, so, being a slight perfectionist, I knew it wouldn't do.  I had already decided on the sentiment for the first card, so I made a second rainbow(the card above)...and had to decide what to do with the imperfect one.  Oh...cover up the ink imperfection with a sentiment!!  So, I used another sentiment from the same sentiment set, die cut and popped it up and the card, saving my rainbow sunshine!!  Here's a close up (LOVE the black embossing...sooo shiny!!)...
Hope you are having a great weekend!  STAMPtember® is less than a week away...can't wait!!!
Thank you so much for visiting me today!! Hugs!! Lisa

Thursday, August 24, 2023

Bunch of Balloons Birthday

I have made a balloon filled birthday card, with some really cool Simon Says Stamp stamps, dies, along with a hot foil sentiment plate!...
I die cut and layered the balloon bunch, and filled with die cut balloons, cut from Simon glitter cardstock.  I hot foiled the "birthday" sentiment, die cut and layered it.  I used two of the sentiments from the stamp set of the hot foil and die set, stamping in versamark and silver embossing.  Here's a close up(sorry about the darkness...seems it happens whenever there is metallic involved!)...
I had started this card so differently, and tried a number of different ways to fill the balloons, but like the purple glitter papers!  Had lots of fun...hope you are doing something...one thing that is fun, today! 
Thanks for visiting me today!! Hugs!! Lisa

Tuesday, August 22, 2023

Retro Flower Birthday

I have made a birthday card with three stamps and a die from the pretty, cool and fun Simon Says Stamp Retro Wishes stamp/die set, from their Just a Note release!...
This was made, by stamping the purple flowers and green leaves, then die cutting the flower bunches and layering.  I adhered them to a panel with the sentiment from the set stamped on it with versamark and black embossed....LOVE the shine!!  I turned one of the bunches opposite of the outside two, and popped it up over the other two. I dotted all the flower with white Enamel Accents.  Here's a close up...
Okay...such great fun!!  Hoping you are having a wonderful week!  Every day getting closer to Simon Says Stamp's STAMPtember® on September 1st...can't wait!!
Thanks for visiting me today!! Hugs!! Lisa

Sunday, August 20, 2023

Daisy Head Birthday

I have made a birthday card with the pretty new Simon Says Stamp Daisy Heads die set from their Just a Note release!...
I die cut the flowers and colored the center with yellow marker.  I die cut the leaves from the Layered Perky Flower die set.  I die cut them with white cardstock and colored them with a green marker.  I adhered them to a textured piece of scrap paper that I had.  I added a die cut and layered Simon Happy Birthday, an some enamel accent dots.  Here's a close up...
I hope your weekend has been wonderful!  Simon's STAMPtember® is right around the corner...be on the lookout September 1st!!  Cannot wait!!! 
Thanks for visiting me today!! Hugs!! Lisa

Sunday, August 6, 2023

Tim Holtz Halloween Distress Mica Stains

I have used three of the cool new Tim Holtz Ranger Distress Mica Stains, from the new Halloween Bundle, to make a "spooky" Halloween card...
I sprayed the stain onto water sprayed pieces of cardstock.  I then dried each piece and die cut the sentiment from each of the three colors.  I layered with a piece of Simon foam and adhered two google eyes to the backs of each of the "o's" in each spooky sentiment.  I stamped the Creepy Crawlers cling stamp and cut down.  I positioned each of the spooky sentiments to allow the spiders' eyes to show...well 12 of them...unlucky #13 didn't make it...he's behind the "oo's" on the middle spooky!  I just thought they were so cute peeking out behind the letters, I had to give as many as possible the chance to look out!  Here's a close up...

I LOVE the shine of these stains...such wonderful fun!!  It's never too early to get ready for Halloween!!
Thank you so much for visiting me today!! Hugs!! Lisa

Saturday, August 5, 2023

Layered Sunflower Hugs

I have used the pretty new Simon Says Stamp Layered Sunflowers stencil set, to make a card for a friend.  This stencil set is from the new Simon Just a Note release!
I LOVE stencil sets!!  This one makes for some pretty flowers!!  I used two different color Simon yellows, a green and brown inks to brush on ink to the cardstock.  I cut the panel , and adhered a die cut and layered sentiment with a sentiment stamp from one of the new Simon stamp sets, also from the new release.  Here's a close up...
I hope this weekend is a happy one for you!  Keep on crafting!
Thanks for visiting me today!! Hugs!! Lisa