Wednesday, May 31, 2023

Elegantly Modern Birthday

I have used the Simon Says Stamp Elegantly Modern Greetings hot foil/die/stamp set from their Dear Friend release, in combo with a fun birthday background stamp, to make a birthday card...
I put the hot foil plate on my Glimmer machine, and after hot foiling the sentiment, I used the coordinating die to cut it out, then layered.  I used the Simon Bunch of Balloons cling stamp for the background.  I made my balloons the same way I did HERE, but used two colors of ink instead of a rainbow. and silver embossed instead of white.  I used a sentiment from the Elegantly Modern stamp set to round out the hot foiled one, with versamark and silver embossing powder.  Here's a close up to show all the shiny...
Happiness to you!
Thanks for visiting me today!! Hugs!! Lisa

Tuesday, May 30, 2023

Wish Big!

I have used the Simon Says Stamp Best Year Yet stamp/die set, from the Dear Friend release, to make a birthday card!
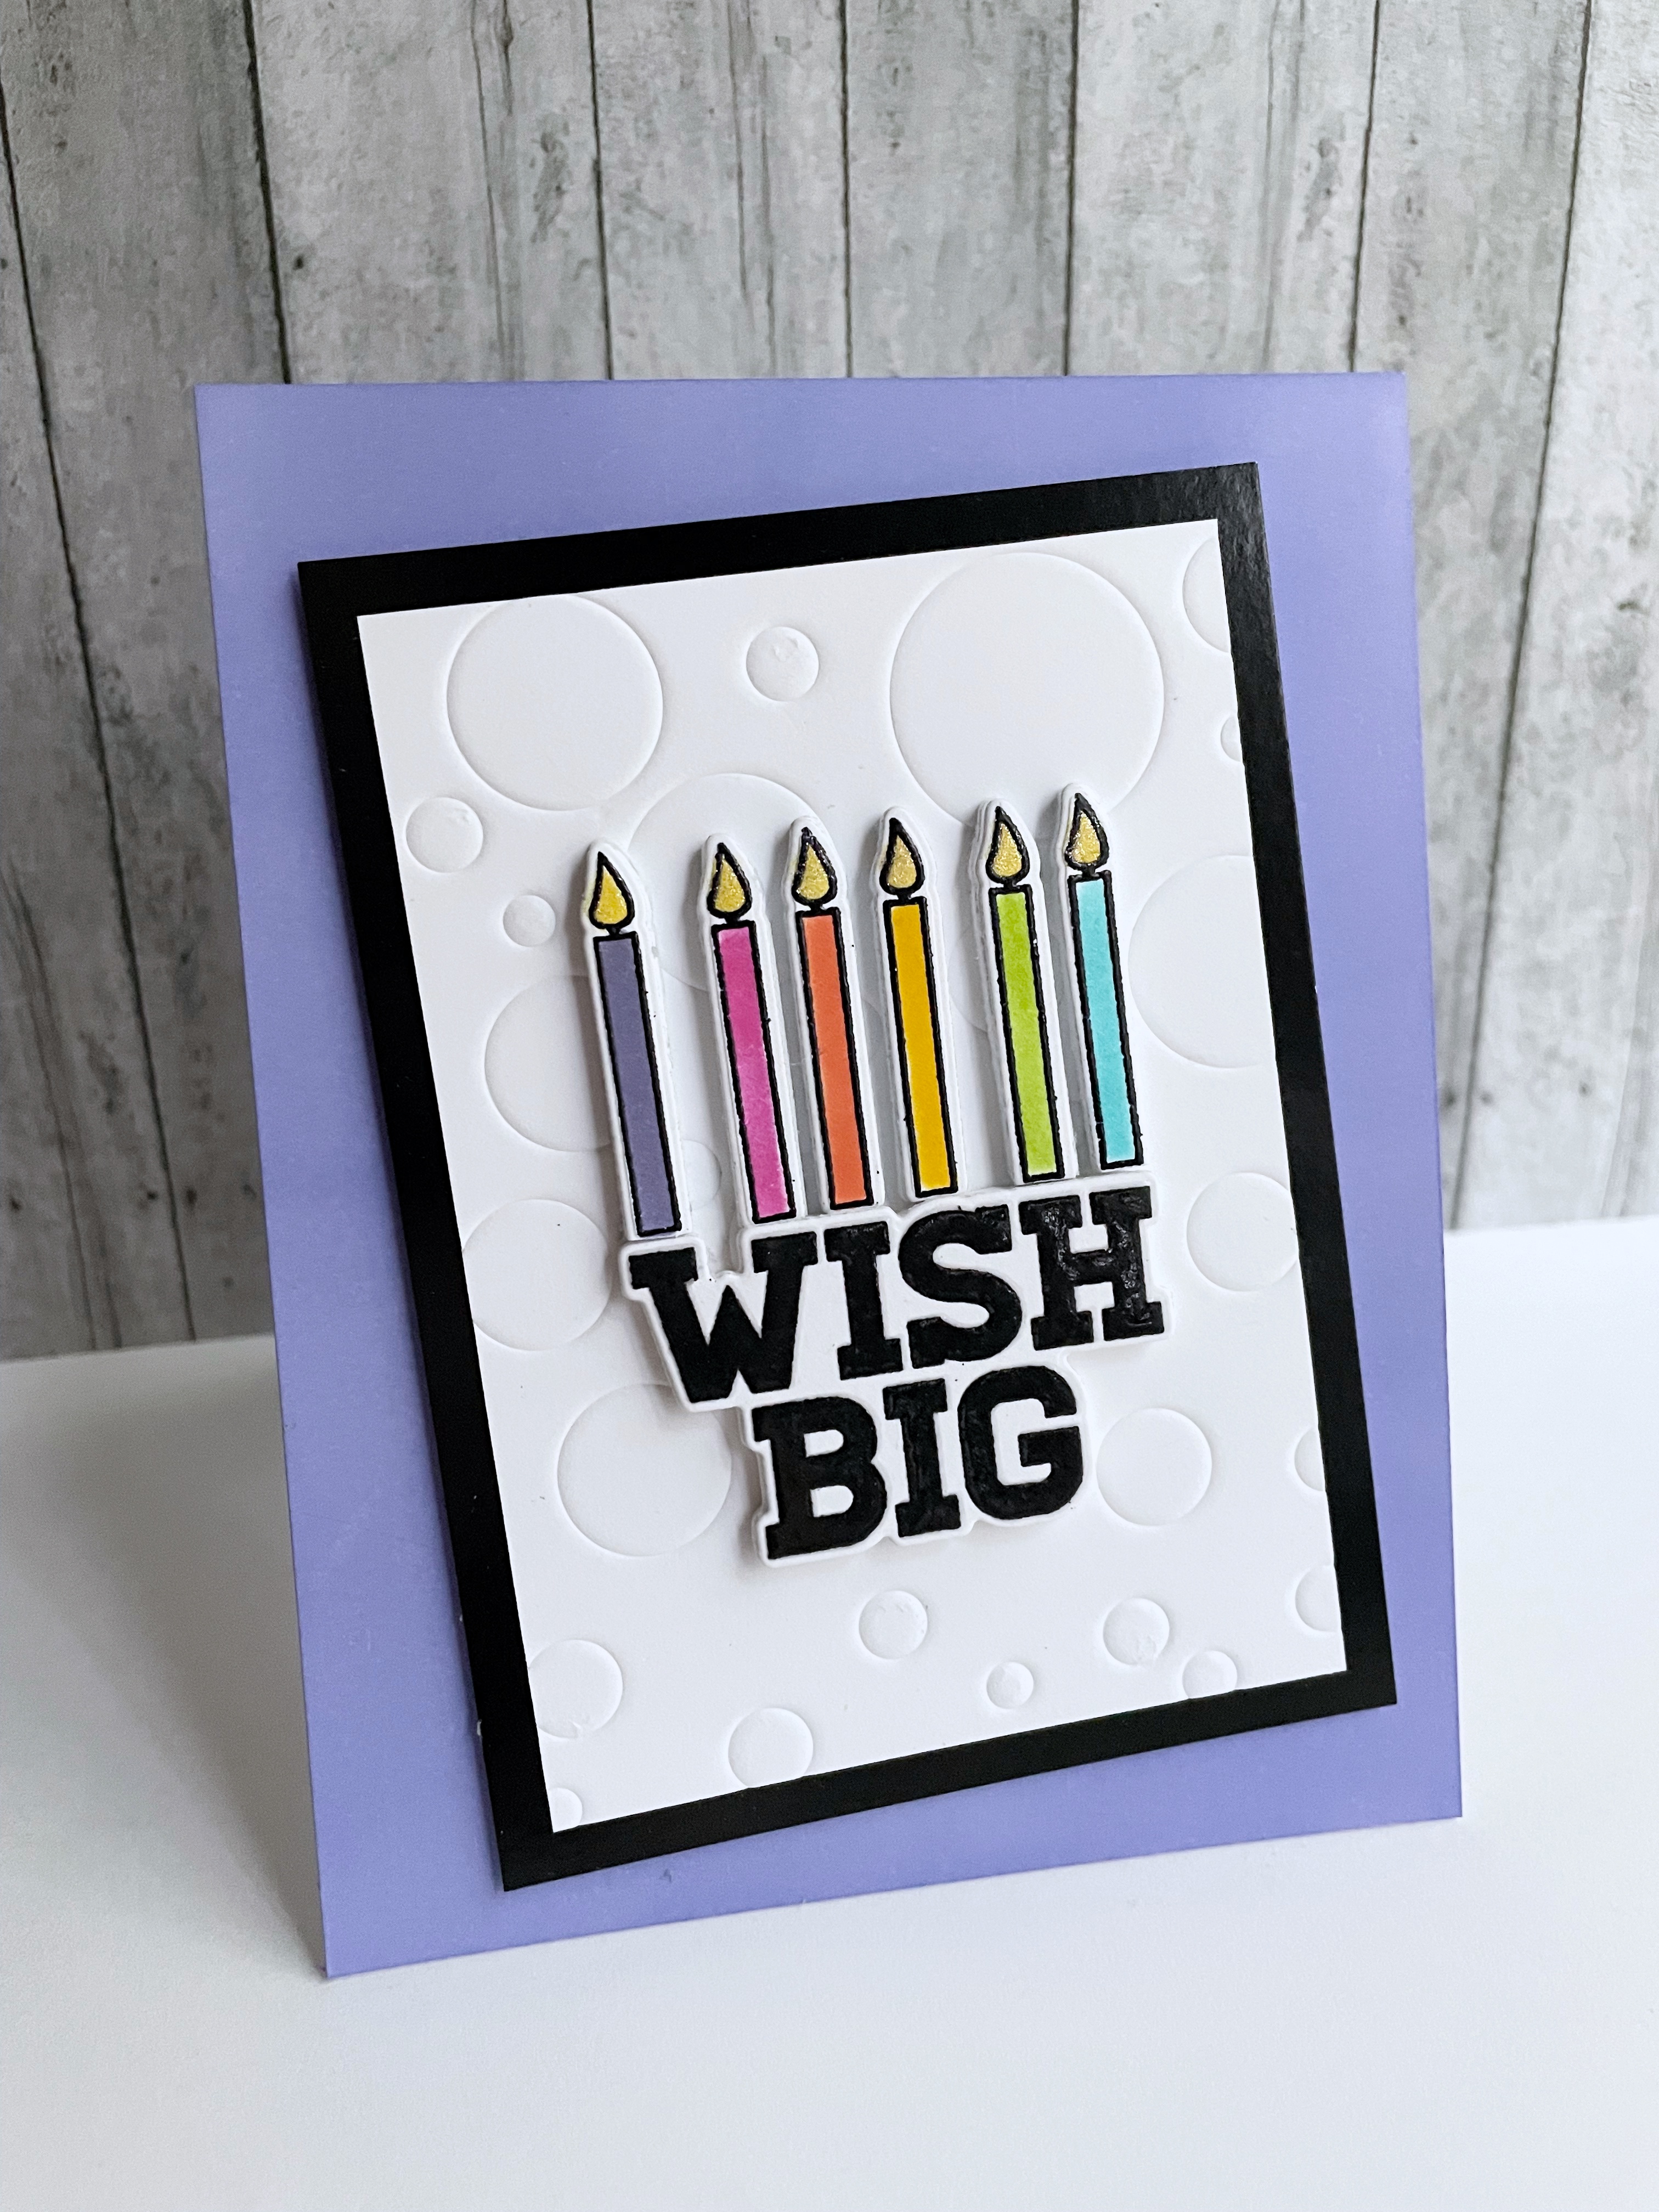
I stamped, die cut and embossed each candle.  This card was supposed to have a stamped and die cut "happy birthday" sentiment that I had brushed on color to, so I decided to brush on the color to each candle with the same color inks.  To do this, I made a stencil of both the flame and the candle by stamping the image twice and handcutting both pieces, the candle from one the flame from the other, and brushed on the colors through my makeshift stencils... 
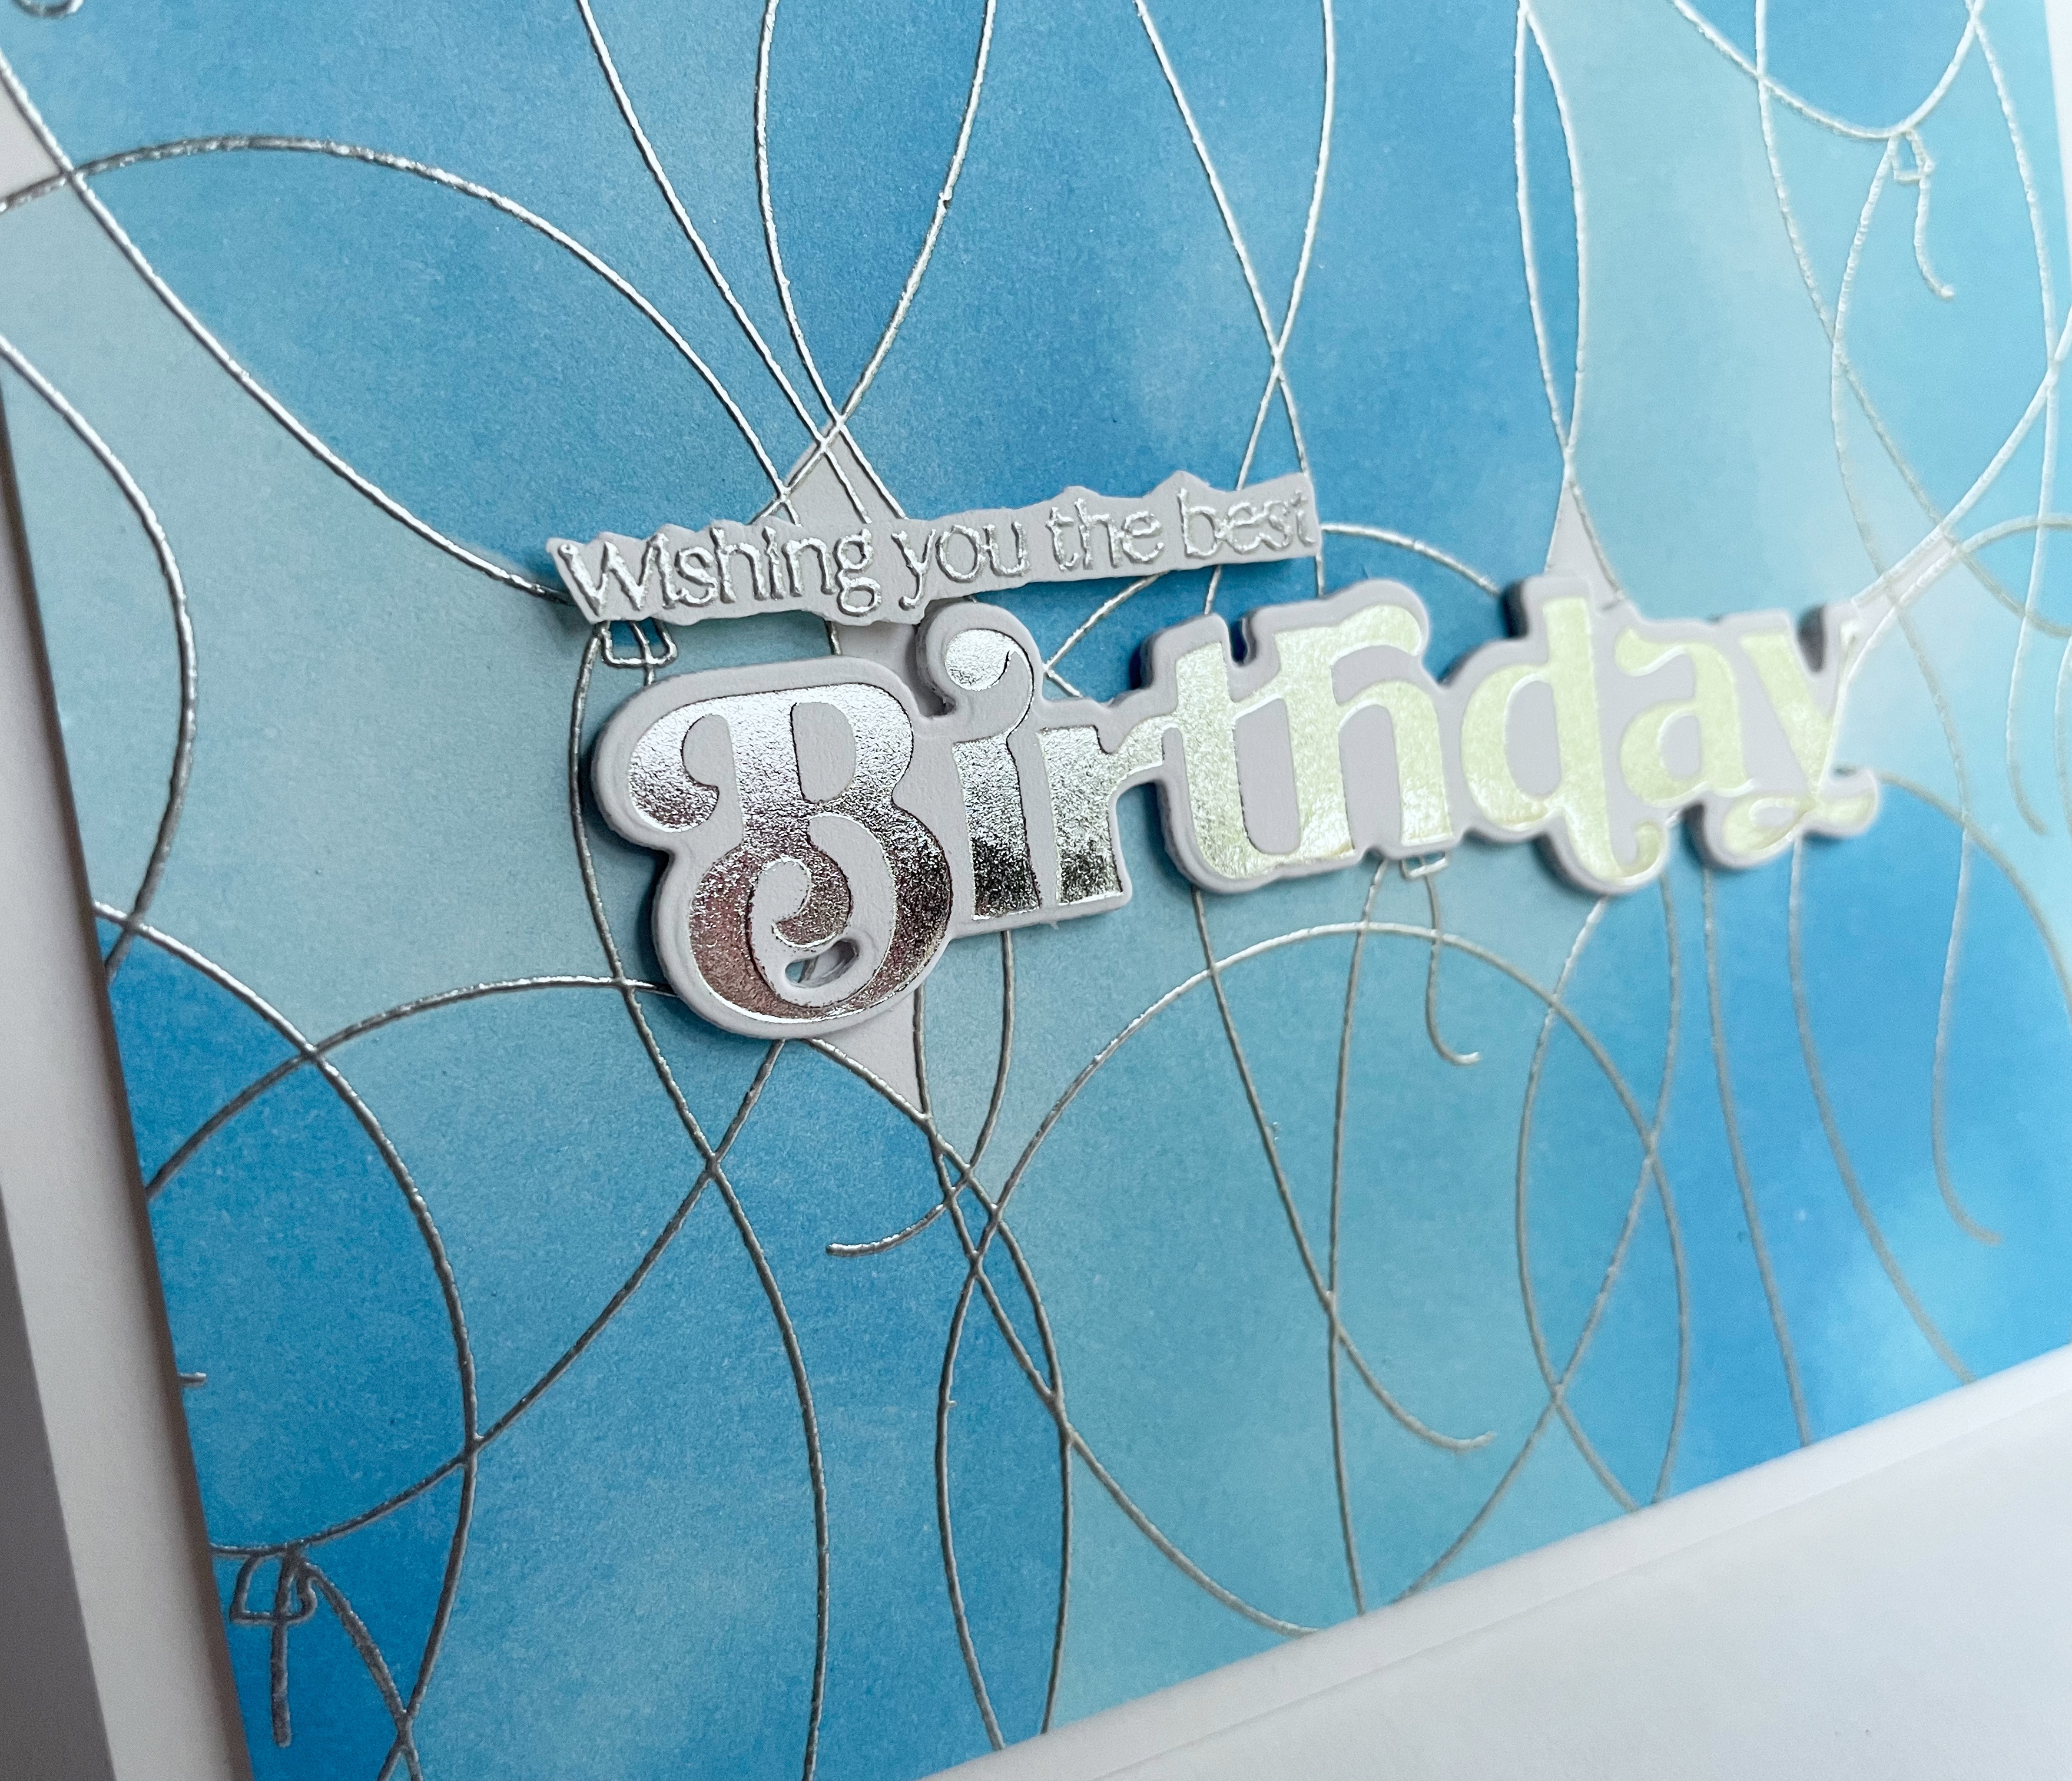
I then used my Wink of Stella to give each flame some glitter.   Deciding not to use the sentiment that I had originally thought of, I decided to use the "wish big" from the set!  I put the stamp in my MISTI and stamped a few times with black ink,  I then cleaned the stamp, and versamarked the stamp and clear embossed the sentiment...twice...to give it a really glossy look.  I die cut it...and found the gloss had been dulled a bit by the die cutting, so I heated it again, good to go glossy!!  I used an old Simon cover die (Full Card Bubbles)for my embossed background, embossing rather than die cutting.  I used a glossy black piece of cardstock behind that, and then popped it up on an angle on piece of ink blended glossy white cardstock, using the same purple ink for the background as the purple candle. I layered the candles and sentiment with the new Simon foam, for dimension.   Here's a close up...
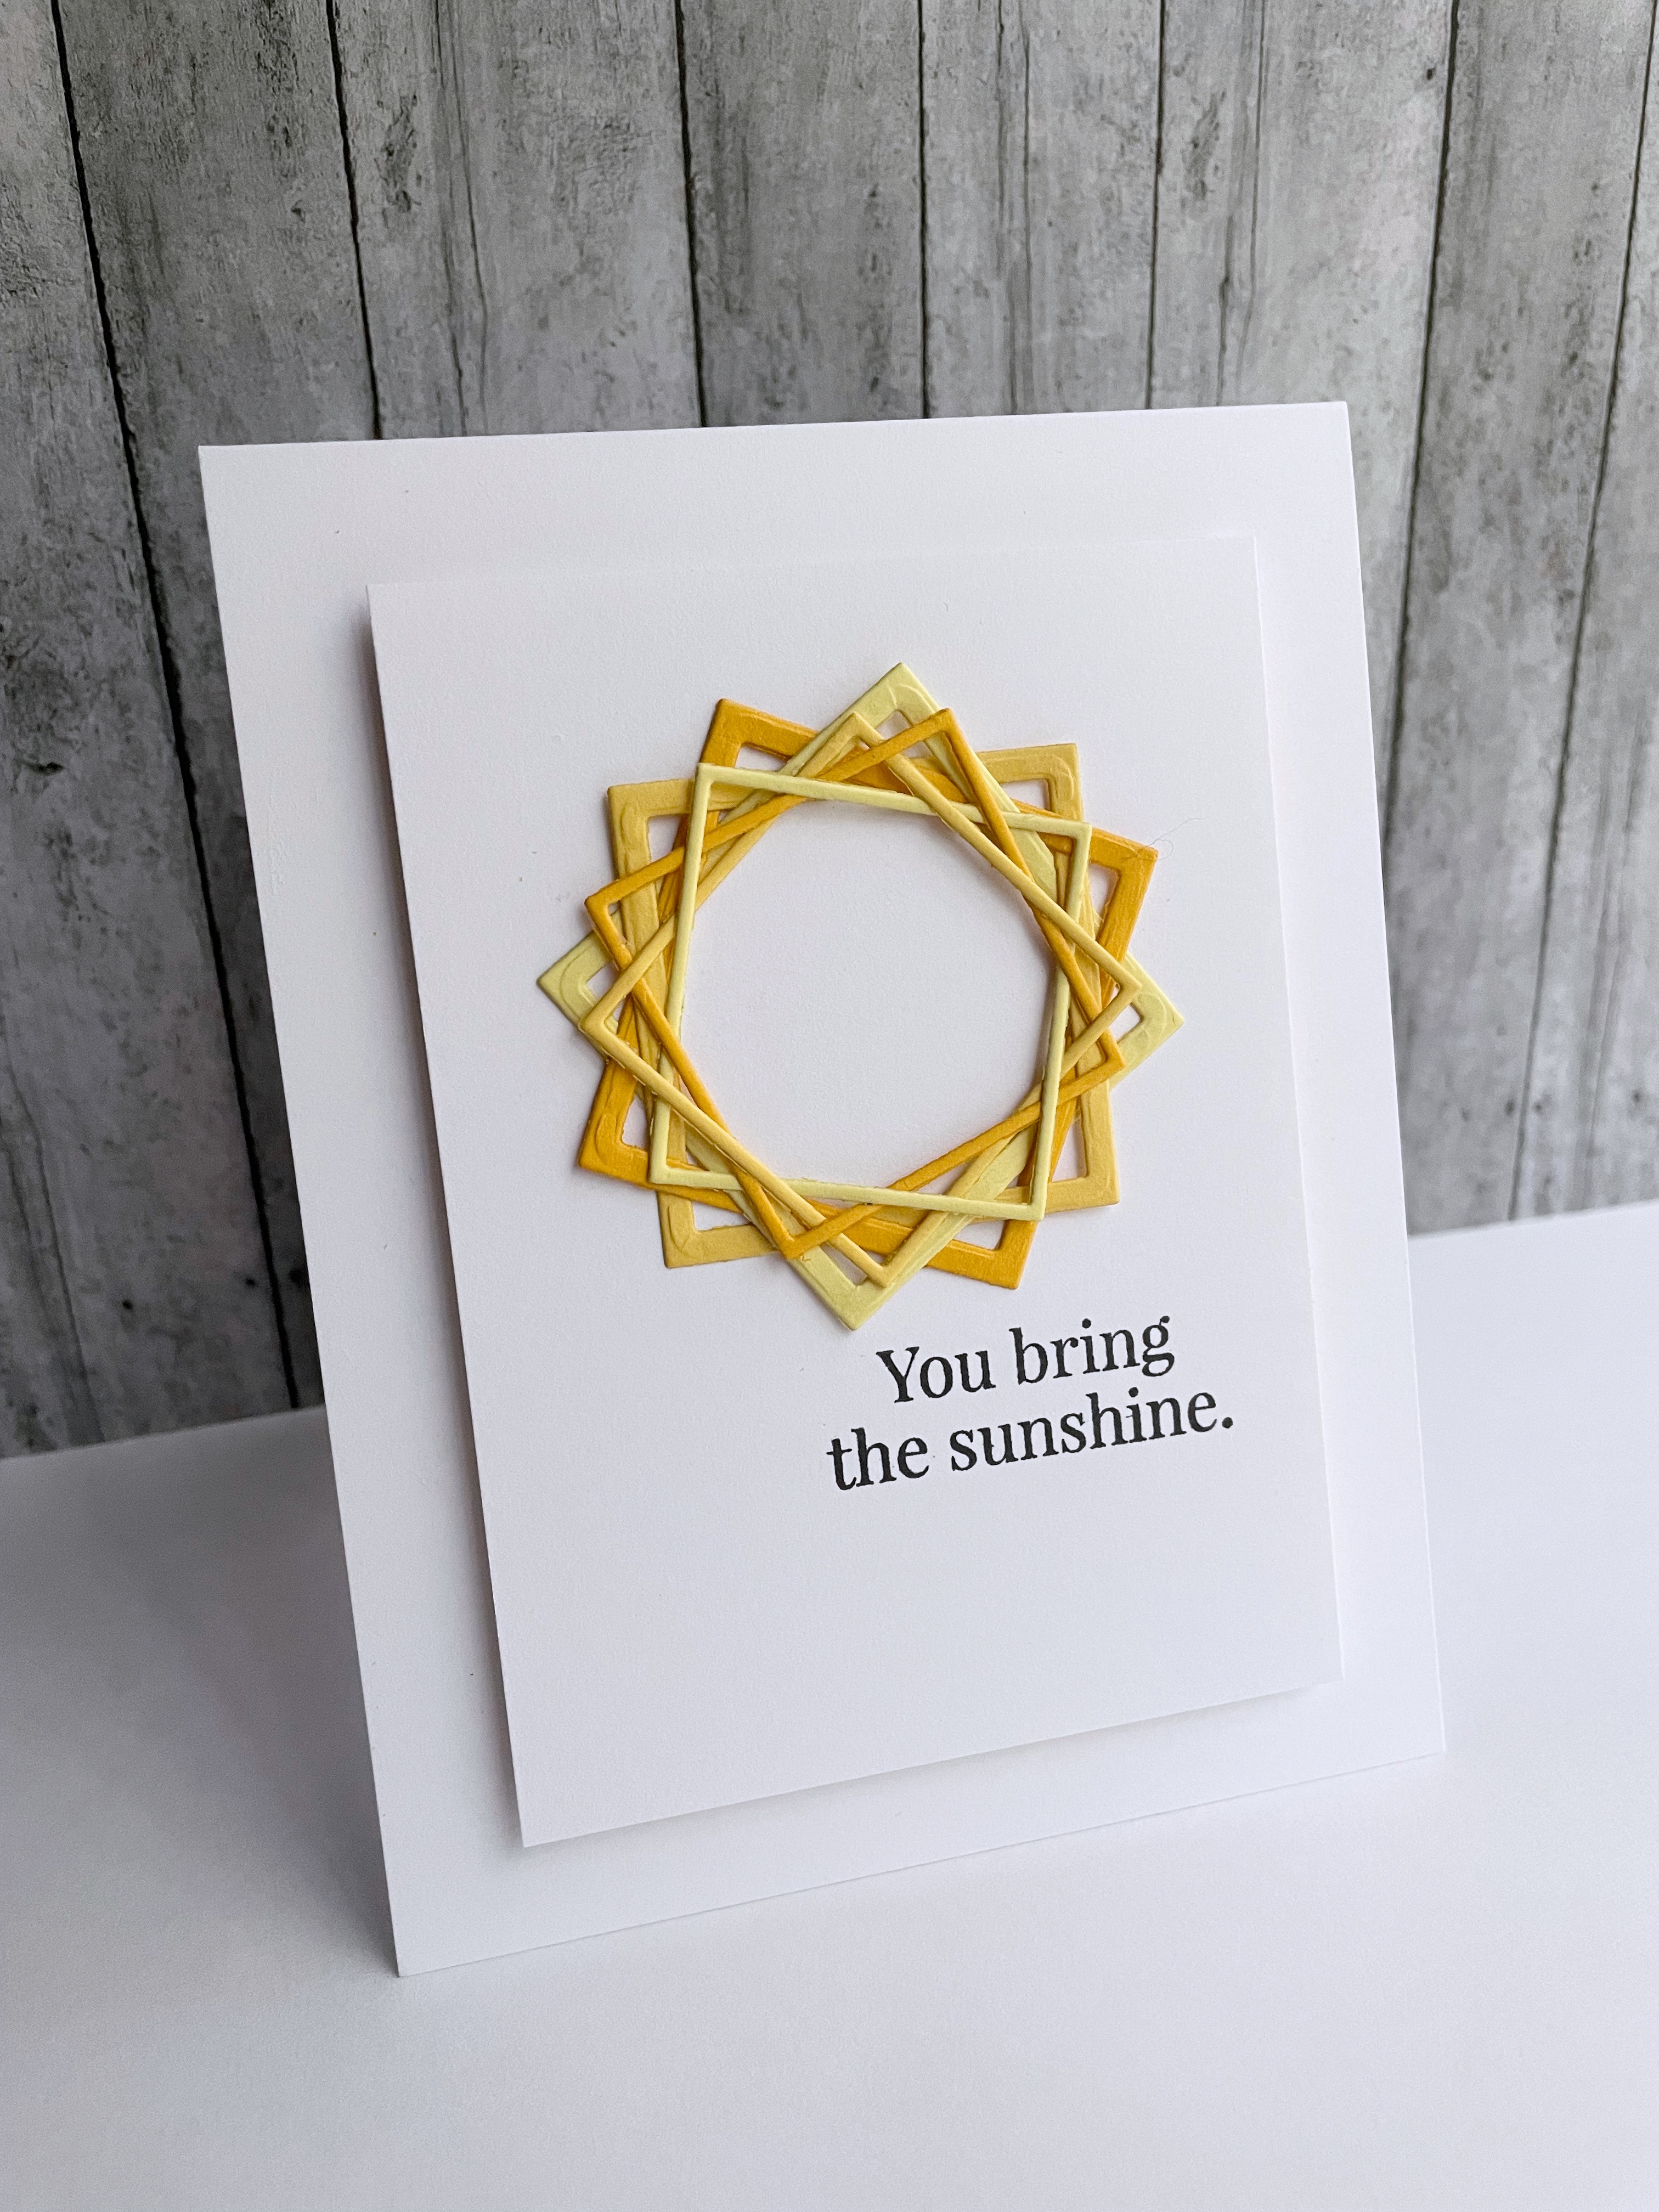
This was one of those cards that I must have mad a 1/2 dozen ways, until I came up with this design and layout.  Some cards prove to be a challenge to your creativity and patience, but I'm happy with how it turned out.  
On a side note...I have had multiple readers ask me about email subscriptions to my blog, and what happened to them??  I'm probably going to post this a few times to catch most readers, but the answer is complicated.  Google did away with the email subscription gadget.  There is still a way to put one on your blog, but you need to be somewhat proficient at coding, and I'm not. I can do simple coding fixes, but  I'm so inept at coding, I messed up my blog, MANY months ago, so that now I cannot stay logged into my blog, and the links to my blog no longer work on Instagram because I can't stay logged in. I can no longer edit my posts from my home blog page, but have to go to my posts page to edit, as I cannot log on, on my home blog page.   If there is anyone who knows how to fix Google blogs, I could use help!  I have tried, unsuccessfully, to contact Google, and to ask for help in the "google community" when I could get no help from Google.  So, as for the emails, I think I will have to change my blog to another platform before I will have an email subscription, I'm a bit on the fence about that...so I'm I am truly sorry... I am trying to figure it out....but until then...thanks for hanging with me!!  
Thanks for visiting me today!! Hugs!! Lisa

Sunday, May 28, 2023

Love Who You Are

I have used the cool new Simon Says Stamp Extra Proud stamp/die set and Pride Flags die set 
from the new Dear Friend release, to make cards for a family member and a dear friend...
I stamped, die cut and colored the hearts with markers.  I used some of the new Simon Foam to pop up the hearts on the card, and used a sentiment from the set to sit in between the hearts on the card.  I stamped it with versamark, and black embossed it.  Here's a pic with the shine from the sentiment...

The second card, I used the Pride Flag to make a card...
I die cut the strips, die cutting a whole flag from each color, for layering.  I used three layers of each color, and made two flags, one of which I have not yet decided what to do with.  I had layered it on the die cut base, but cut the base away, after adhering all the strips.  Here's how I adhered all the strips to the base...
I lined all the layered strips together and adhered them with a couple pieces of removal tape.  I then flipped the taped strips over, put glue on the strips, and then flipped them back over, onto the base and positioned...done.  I thought that was so much easier than lining up each strip individually.  With this one, though, as I said, I cut the base away, as I decided to put this flag in a "window".  I added the same sentiment as the first card, cause I love it so much, but this time, as I had no other hearts of love on the card, decided to add a die cut and layered heart on the word "love".  I stamped the sentiment like the first card, with versamark and black embossed.  Here's a close up...
 Love, that's what it's all about!!  Thanks so much for stopping by, Hugs, Lisa!

Thursday, May 25, 2023

Heart Quilt

I used the very fun new Simon Says Stamp Modern Heart Quilt stamp/die/stencil set from their Dear Friend release, to make a card for, what else, a dear friend😊!...
I stamped the heart from this set using my MISTI and some Simon Smoke ink.  I then stenciled a rainbow of colors with the 6 stencils.  I let the inks dry, then put the heart back in my MISTI, rubbed with static powder, stamped with Versamark, and black embossed.  I then cut out the heart, and adhered some of the new Simon foam on the back of the heart to pop it up.  I also black embossed the sentiment, which I cut into a strip and adhered to the heart.  I adhered the heart to a panel of glossy black cardstock, and then to a card.  Here's a close up(love all the shine....embossing and glossy cardstock!)...
Stencils with stamp sets are so cool and so much fun!  I love how this turned out!  Hope you've had a great    day...and that you will have a great weekend!!
Thanks for visiting me today!! Hugs!! Lisa

Monday, May 22, 2023

Happy Hello

I am using the pretty new Simon Says Stamp Fancy Hello die, from their Dear Friend release, to make a Hello card with some happy, friendly daisies..
I used some Simon white glossy cardstock to blend three different inks on.  I die cut the Hello from the blended color cardstock.  I layered with some of the new Simon foam...loving this for layering!!  I adhered the layered sentiment on a daisy embossed panel, which I had colored in the centers of the flowers with a small detail round blending brush.  I added a stamped and cut out sentiment to adhere above the hello.  Here's a close up...
Having so much fun with this new release!  Hoping you are having a great start to this new week...hoping, too, that all is well in your part of the world!  
Thanks for visiting me today!! Hugs!! Lisa

Saturday, May 20, 2023

Dear Friend Blog Hop!

I am so thrilled to be a part of today's Simon Says Stamp Blog Hop, over at the Simon Blog, celebrating Simon's newest release, Dear Friend!  Dear Friends are definitely a wonderful part of card making, and this month's release has stamps, dies and accesories, that will help us to  let our friends know how dear they truly are!  I have used one of the pretty new sentiment dies, to make three cards to share with you today!...  
I used thin strips of each of the colors of the Simon Pastel Color Blend cardstock panels, adhering them together, and die cutting from them.  The cool thing is, that the length of these strips afforded me the opportunity to die cut three sentiments, and make three cards!
The first one I used four more die cuts, in white,  and lined them up down the card, with the pastel one, which I had layered(with the new Simon foam!), towards the top of the all the sentiments.  I used stamped sentiments for all three cards from one of the wonderful new stamp sets, Elegantly Modern Greetings!  Here's a close up...

The second one, much like the first...
For this one, I used the card in the opposite position, and used three white cardstock "thanks", with the die cut and layered pastel sentiment towards the bottom 1/2 of the card.  Here's a close up...

The third one I used the pastel die cut insde the outline of the die cut...
On this card, I used two stamped sentiments, one above and one below the die cut sentiment.  I also used a tiny die cut heart to add a little interest and tie in the sentiment.  I love the shine of this glossy blended cardstock!  Here's a close up of this card, that shows that!...
Simply done, simply fun!  Making these cards was SO much fun...now it's your turn for some fun!  
Simon is generously giving a $25 coupon to every stop on the hop from our comment sections, so the more hop blogs you comment on, the more chances you will have to win!  Winners will be chosen and posted on the Simon Blog on Wednesday, May 24th, so make sure you check the Simon Blog on the 24th, to see if you are a winner!!  If you are a winner, you can email Simon to claim your prize!
The list of participants in today's hop are listed below...

Simon Says Stamp Blog 

Nina-Marie Trapani

Caly Person

Suzy Plantamura

Debby Hughes

Sidnie Des Jardins

Amy Rysavy

Lisa Addesa

Emily Midgett

Tina Smith

Emma Williams

Lea Lawson

Bobbi Lemanski

Seeka

One thing before I go....just like it says in the banner at the top of my post, there will be a second blog hop tomorrow at the Simon Blog, so hope you will join in the fun tomorrow for more celebration and inspiration!  

Thank you so much for stopping by, and keep on hopping!

Friday, May 19, 2023

Dear Friend Release!

There's a new relesase over at Simon Says Stamp, Dear Friend!  I have made a card with one of the cool, and fun new dies, Hey Girl!...
i
I used Simon glossy black  and pink glitter cardstock for both the die, and the background.  I layered the Heys with one layer of black, and the "girl" I layered with the new Simon foam, for some height!  I embossed the background with a Simon embossing folder and then adhered the sentiment to the embossed panel.  
Here's a close up...
This was so much fun!  Hope you will check out the new release...there are so many wonderful new products!!  There will also be two blog hops in the next couple days at the Simon Blog, hoping you will hop along for some inspiration and the chance to win some money to shop at Simon!  Happy Friday!! 
Thanks for stopping by today!! Hugs!! Lisa

Monday, May 15, 2023

Thin Frames Repurposed!

I had used the Simon Says Stamp Thin Frames for a card recently.  After I got done with the card, I had some of the frames leftover, and by sheer accident, with them being intertwined with each other, I had fun making them into some things other than frames!...
A sunshine and a sunflower!!
I used three yellow colored cardstock, die cut the frame three times, and this is what I had...
I weaved the thicker ones together, then the thinner ones together...
Then I adhered them together, the thin ones on top of the thick ones...
I added a sentiment and simply done!  Here's a close up...

The second one, I added a brown center and made the frames into a sunflower...
I used a sunflower center die from another Simon set, and made sure to puff up all ther little cuts all around the die cut to give it dimension.  I also gave the center some height with some foam sticky pieces underneath.  I added a Simon sentiment, from the Big Birthday Greetings(so sorry, no longer available), and done!   Here's a close up...
I thought these were cute and fun, so, although different, I hope you "get" them?!
Hope you are having a great start to the week...be looking for a Simon release at the end of the week!
Thanks for visiting me today!! Hugs!! Lisa